run the following command: Logman.exe create counter Perf-Counter-Log3 -o “C:\perflogs\Perftest3.blg” -f bincirc -v mmddhhmm -max 250 -c “\LogicalDisk()*” “\Memory*” “\Network Interface()*” “\Paging File()*” “\PhysicalDisk()*” “\Processor()*” “\Process()*” “\Redirector*” “\Server*” “\System*” “\Thread*” -si 00:00:03 Then go to Performance Monitor Data Collector Set>User Defined > Right Click on Perf-Counter-Log and start
Or type command in CMD To start – Logman.exe start Perf-Counter-Log1Perf-Counter-Log1 To Stop – Logman.exe stop Perf-Counter-Log
PowerShell Script — Top 10 by Maximum % CPU (Excluding _Total and Idle)
Use this version to find which processes had the highest peak CPU usage in your PerfMon CSV:
# Path to your CSV log
$csvPath = “C:\PerfLogs\output.csv”
# Import the CSV
$csv = Import-Csv $csvPath
# Detect all process CPU % Processor Time columns
$cpuCols = ($csv |
Get-Member -MemberType NoteProperty |
Where-Object Name -Match ‘\\Process\(.+\)\\% Processor Time’).Name
We are running Oracle Linux 8.10 KVM and We are observing that memory over-provisioning behaves statically — KVM reserves approximately one-third of the guest memory at launch, and no any dynamic memory reclamation or redistribution.
Whether Oracle KVM (standalone, without OLVM) currently supports any form of dynamic memory allocation or automatic reclamation?
Autodeflate option. This feature allows the QEMU VirtIO memory balloon device to release memory just before a guest process would otherwise be terminated by the Out-of-Memory (OOM) killer. ==== The optional autodeflate attribute allows to enable/disable (values “on”/”off”, respectively) the ability of the QEMU virtio memory balloon to release some memory at the last moment before a guest’s process get killed by Out of Memory killer. ==== Ref: https://libvirt.org/formatdomain.html
1. The Difference **Hyper-V (Dynamic Memory):** The VM says “I need more RAM,” and the Host gives it automatically (up to the limit). **KVM (Memory Ballooning):** The Host says “I need that RAM back,” and takes it from the VM. *Key Takeaway:* KVM’s dynamic memory tools (Ballooning) are designed primarily to **save memory for the Host**, not to automatically **give memory to the Guest**
2. How “On-Demand” works in KVM If you want a Windows VM to start small (e.g., 4GB) but grow if needed (e.g., to 16GB), KVM requires a **manual trigger** or a specific configuration. It does not happen automatically just because Windows is busy.
To achieve this, you use **Memory Hot-Plug**: **Configure limits:** Set the VM’s “Memory Size” to 4GB and “Max Memory” to 16GB. **The Limitation:** When Windows hits 100% usage of the 4GB, it will **not** automatically get the extra 12GB. It will simply run out of memory. **The Action:** An administrator (or a script) must explicitly command the Host to “Hot Plug” more RAM into the VM, or “Deflate” the balloon to release more reserved memory to it.
3. You cannot rely on KVM to automatically rescue a Windows VM that is running out of RAM. * **Recommendation:** Enabled KSM (which saves massive amounts of space), it is safer to simply **assign the full amount of RAM** (e.g., 16GB) to the Windows VM from the start. * **Benefit:** KSM will deduplicate the unused parts anyway, so you get the memory savings of “Dynamic Memory” without the risk of the VM crashing because it couldn’t grow fast enough.
Kernel Samepage Merging (KSM) Optimization
Oracle recommended modifying the KSM value to enhance memory efficiency in virtualized environments.
Overview of KSM:
Kernel Samepage Merging (KSM) is an advanced memory management feature that identifies identical memory pages across systems and allows them to share a single physical memory page.
At a technical level, spot VMs are the same as regular VMs. They use the same images, hardware, and disks that translate to the same performance. The difference between spot and regular VMs comes down to priority and availability. Spot VMs have no priority to access compute capacity, and they have no availability guarantees after accessing that compute capacity.
Spot VMs are cheaper because of the eviction possibility.
· Azure Spot Instances are not reliability guaranteed, they get evicted with a 30seconds heads up.
· Virtual Machines (VMs) have eviction rates expressed as percentages per hour, ranging from 0–5% to 20+%, and can vary by region. For example, an eviction rate of 10% means that there is a 10% chance that a VM will be evicted within the next hour.
· Azure Spot Virtual Machines (VMs) have eviction rates expressed as percentages per hour, ranging from 0–5% to 20+%, and can vary by region. For example, an eviction rate of 10% means that there is a 10% chance that a VM will be evicted within the next hour
Using Azure Resource Graph (ARG) to get Spot Eviction Rates and Alternative Spot Instance Types: Navigate to ARG in Azure portal using this link
Tags in Azure Resource Manager are key/value pairs you apply to subscriptions, resource groups, and resources (not management groups) for things like cost tracking, environment classification, owner identification
Special Characters are not supported in tag names for few Azure resources
Azure enforces rules around how tags can be used on resources. For example, certain services disallow spaces, colons (:) or other special characters in tag names, and some also prohibit tag names that begin with a number.
For EX
Azure DNS Zones
Azure Traffic Manager
To address this issue we can use the custom policy so that resources which do not support special characters in their tagging are excluded from policy evaluation. This exclusion explicitly covers those resource types and any of their child resources
Certain Azure services—such as virtual machines, virtual machine scale-sets, and App Services—automatically spin up additional components (for example NICs, VM extensions, load-balancers, or autoscale settings) during deployment. When a tag applied at the parent level must flow down to all children, enforcing a policy that requires tags on every resource may cause the deployment of those child resources to fail, which can in turn block the deployment of the parent resource.
There is not solution for this issue and the workaround is selectively excluding certain child resources from policy evaluation
Adding tags is not supported in portal.
Some Azure resources support tagging but don’t allow tags to be added or edited via the Azure Portal. To ensure they comply with tagging policies, tags must be applied through the Azure REST API.
In this blog we can see the steps to enable the Encryption at host for VMs and AKS nodes.
The policy targets the resource types Microsoft.Compute/virtualMachines and Microsoft.Compute/virtualMachineScaleSets, with the field securityProfile.encryptionAtHost
For New VM
Check the status of the Azure Feature
Azure CLI
az loginaz feature show --namespace"Microsoft.Compute"--name"EncryptionAtHost"--query"properties.state"
If the output is true, Then encryption at host is confirmed as enabled on your node pool.
Encryption at host cannot be enabled in AKS Cluster using Azure Portal. It can be done only via Azure CLI and Terraform command:
az aks create \
–name test-encrypt-aks \
–resource-group Ganeshtest \
–node-vm-size Standard_D4ds_v5 \
–enable-encryption-at-host \
–node-count 1 \
–generate-ssh-keys
After performing the above command successfully, Add a user node pool with encryption at host:
Existing Node Pools cannot be modified to enable encryption at host. Those node Pools must be deleted and new ones should be created with encryption enabled. Using this command:
az aks nodepool add \
–resource-group Ganeshtest \
–cluster-name test-encrypt-aks \
–name userpool1 \
–node-vm-size Standard_D4ds_v5 \
–node-count 1 \
–mode User \
–enable-encryption-at-host
AKS cluster must have at least one node pool designated as a “System” node pool to ensure that essential system services continue to run.
In AKS, at least one node pool must be marked as a system mode pool, which is responsible for hosting critical system components like CoreDNS, kube-proxy, and Azure Policy pods. Since the original agentpool is still the only system node pool in the cluster
To resolve this, you’ll need to create a new node pool with –mode System specified in the command. Once that new system node pool is up and running,
az aks nodepool add –name newagpool –cluster-name ganeshtesttobedel-ci-aks–resource-group Ganeshtest –node-vm-size Standard_D4ds_v5 –enable-encryption-at-host –mode System
These are the steps to migrate the pods to a healthy node pool:
1. Cordon the failing node pool This marks its nodes as unschedulable.
kubectl get nodes -l agentpool=<oldpool-name> # repeat for each node kubectl cordon <node-name>
2. Evict running pods from failing nodes This safely drains pods from the failing nodes to the healthy ones.
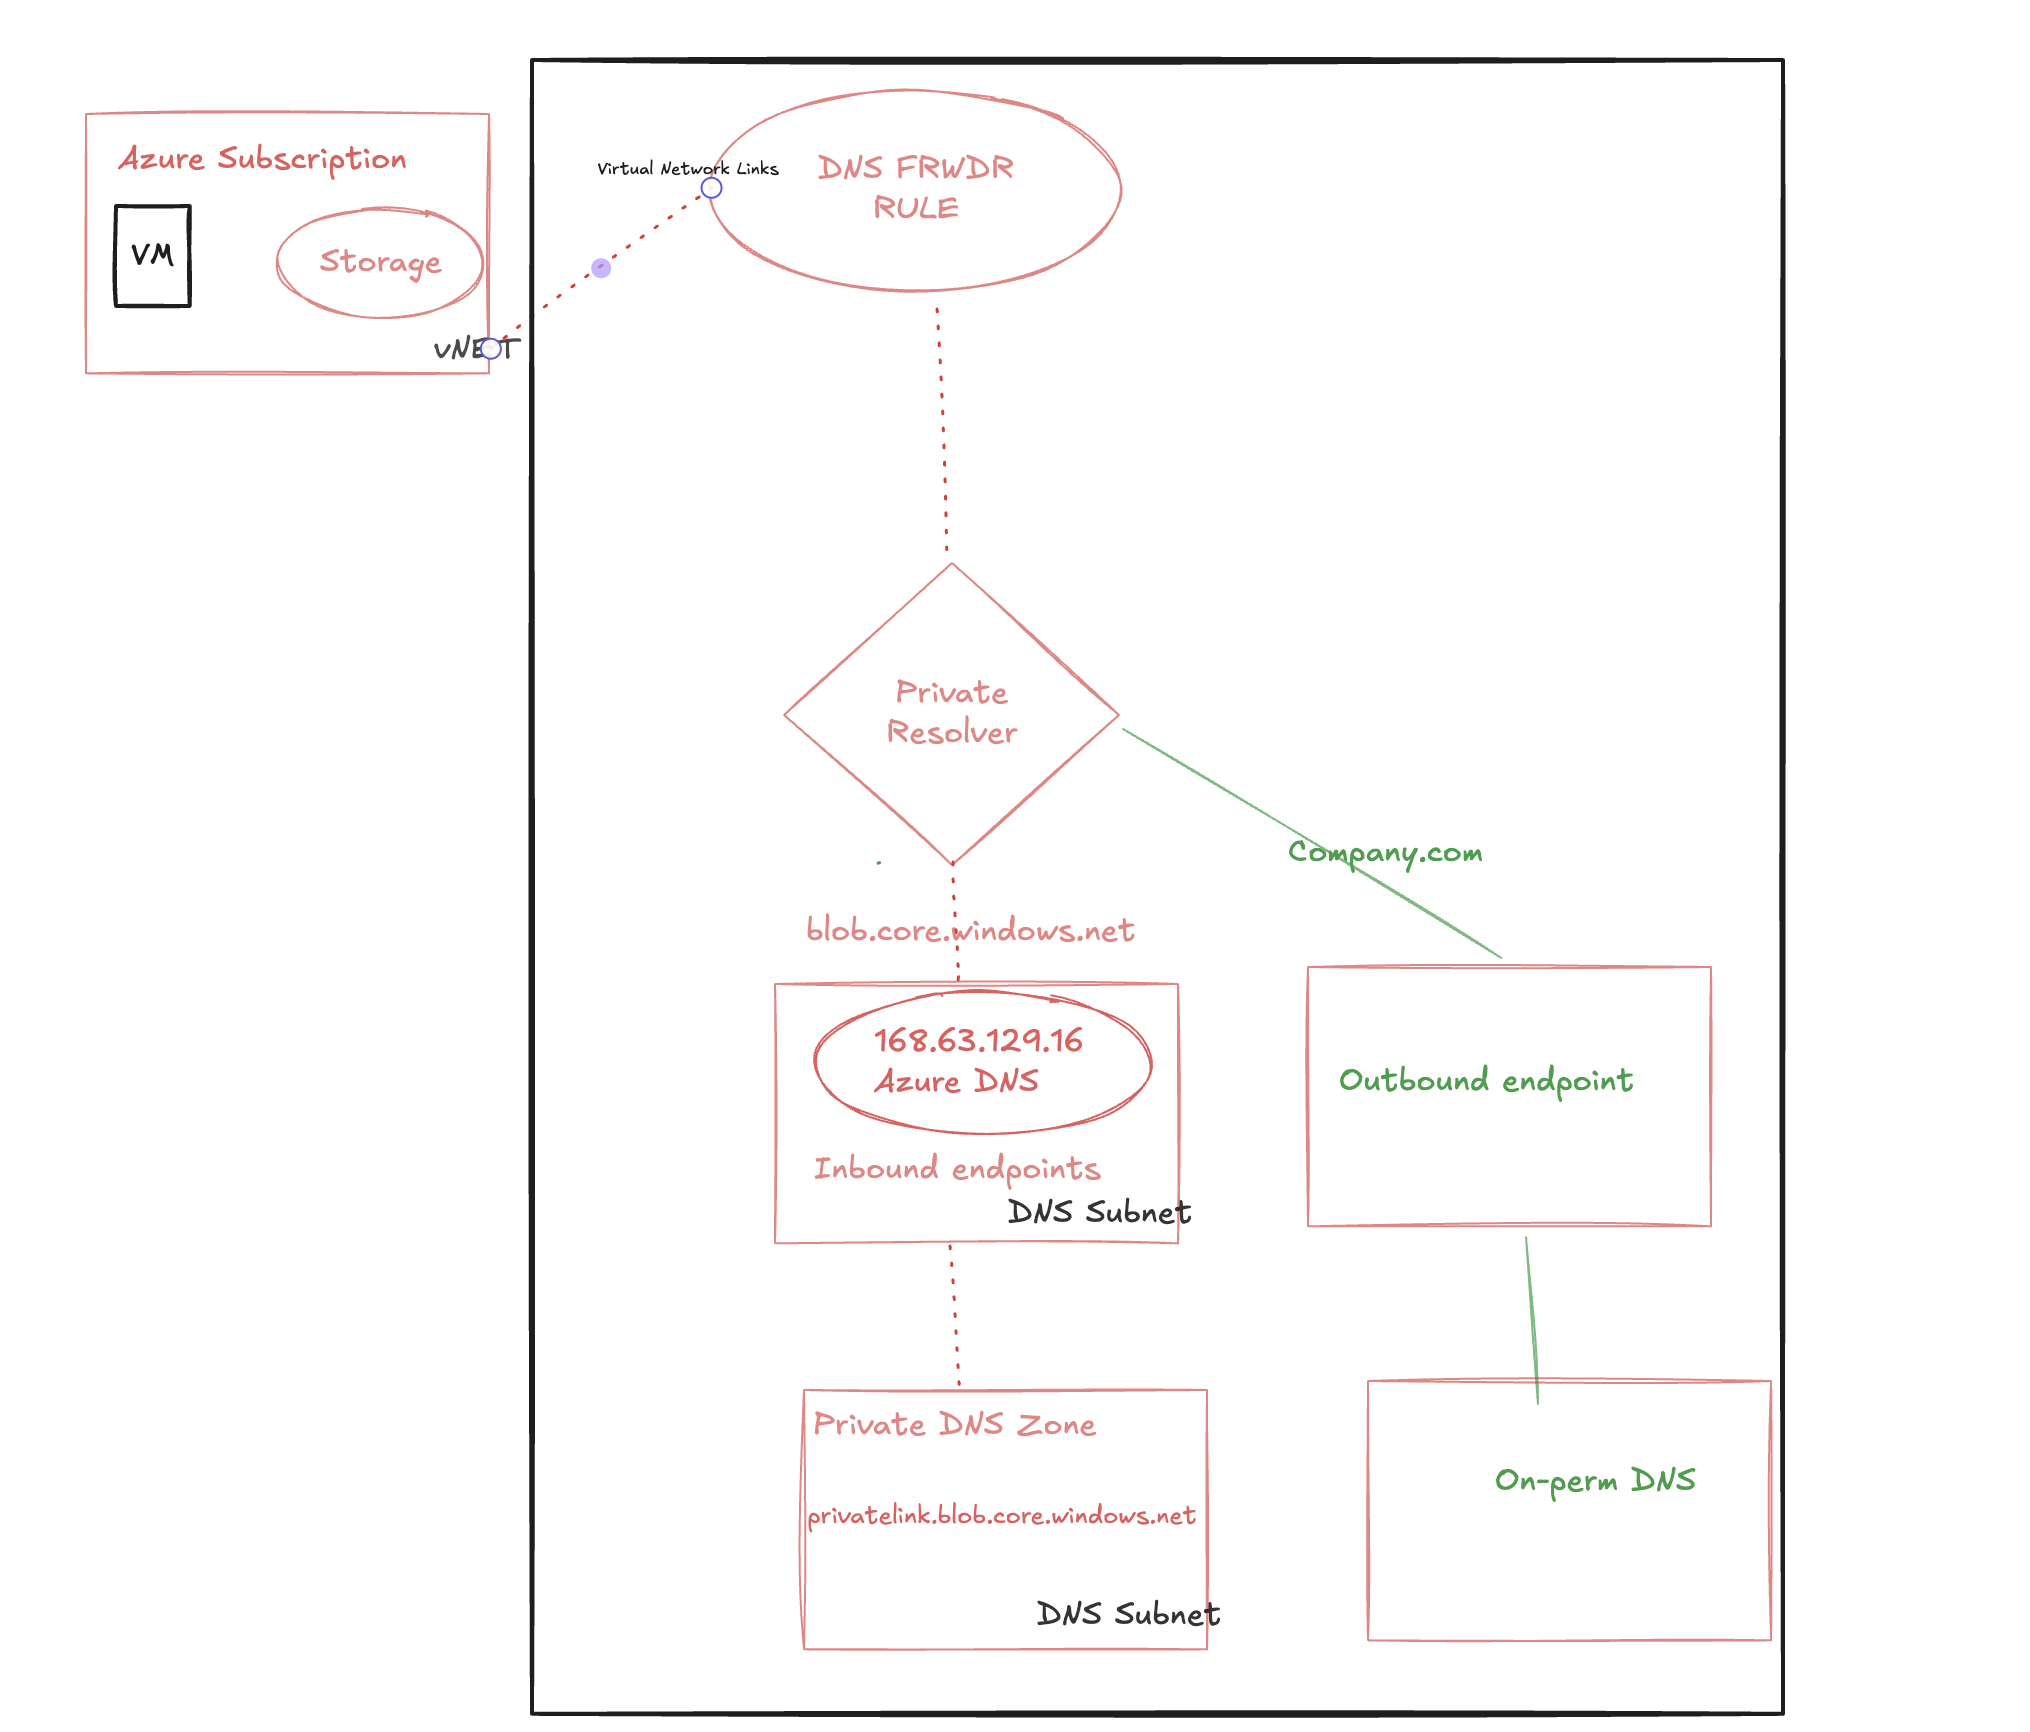
We have a requirement to make sure all the Azure VMs are resolving to our company.com which is our primary DNS domain for on-perm services and also VMs running Azure and from on-perm should resolve azure services like Storage,AKS.
Reference: The Azure DNS Private Resolver service is injected into your Virtual Network and utilises network interfaces for two functions:
Outbound Endpoints – a maximum of five – used to forward resolution requests to destinations within your internal private network (Azure or On-Premises), that cannot be resolved by Azure DNS Private Zones. How the outbound endpoint behaves in respect to forwarding, is dictated by the configuration of the associated DNS Forwarding Ruleset
Inbound Endpoints – a maximum of five – used to receive inbound resolution requests from clients within your internal private network (Azure or On-Premises).
Azure VM resolving the services in on-perm company.com
For the first scenario to access the services hosted in our on-perm from Azure VM, we created the private resolver with outbound rule and if any DNS request to company.com then it will route the traffic to the out-bound rule in the private resolver.
VM sends a DNS query asking for IP associated to gittest.company.com to Azure Provided DNS 168.63.129.16.
DNS forwarder rule will route the traffic to outbound endpoint since it is company.com
As final step outbound endpoint will route it to the on-perm DNS.
The VM will now be able to access the gittest.company.com via Private Endpoint.
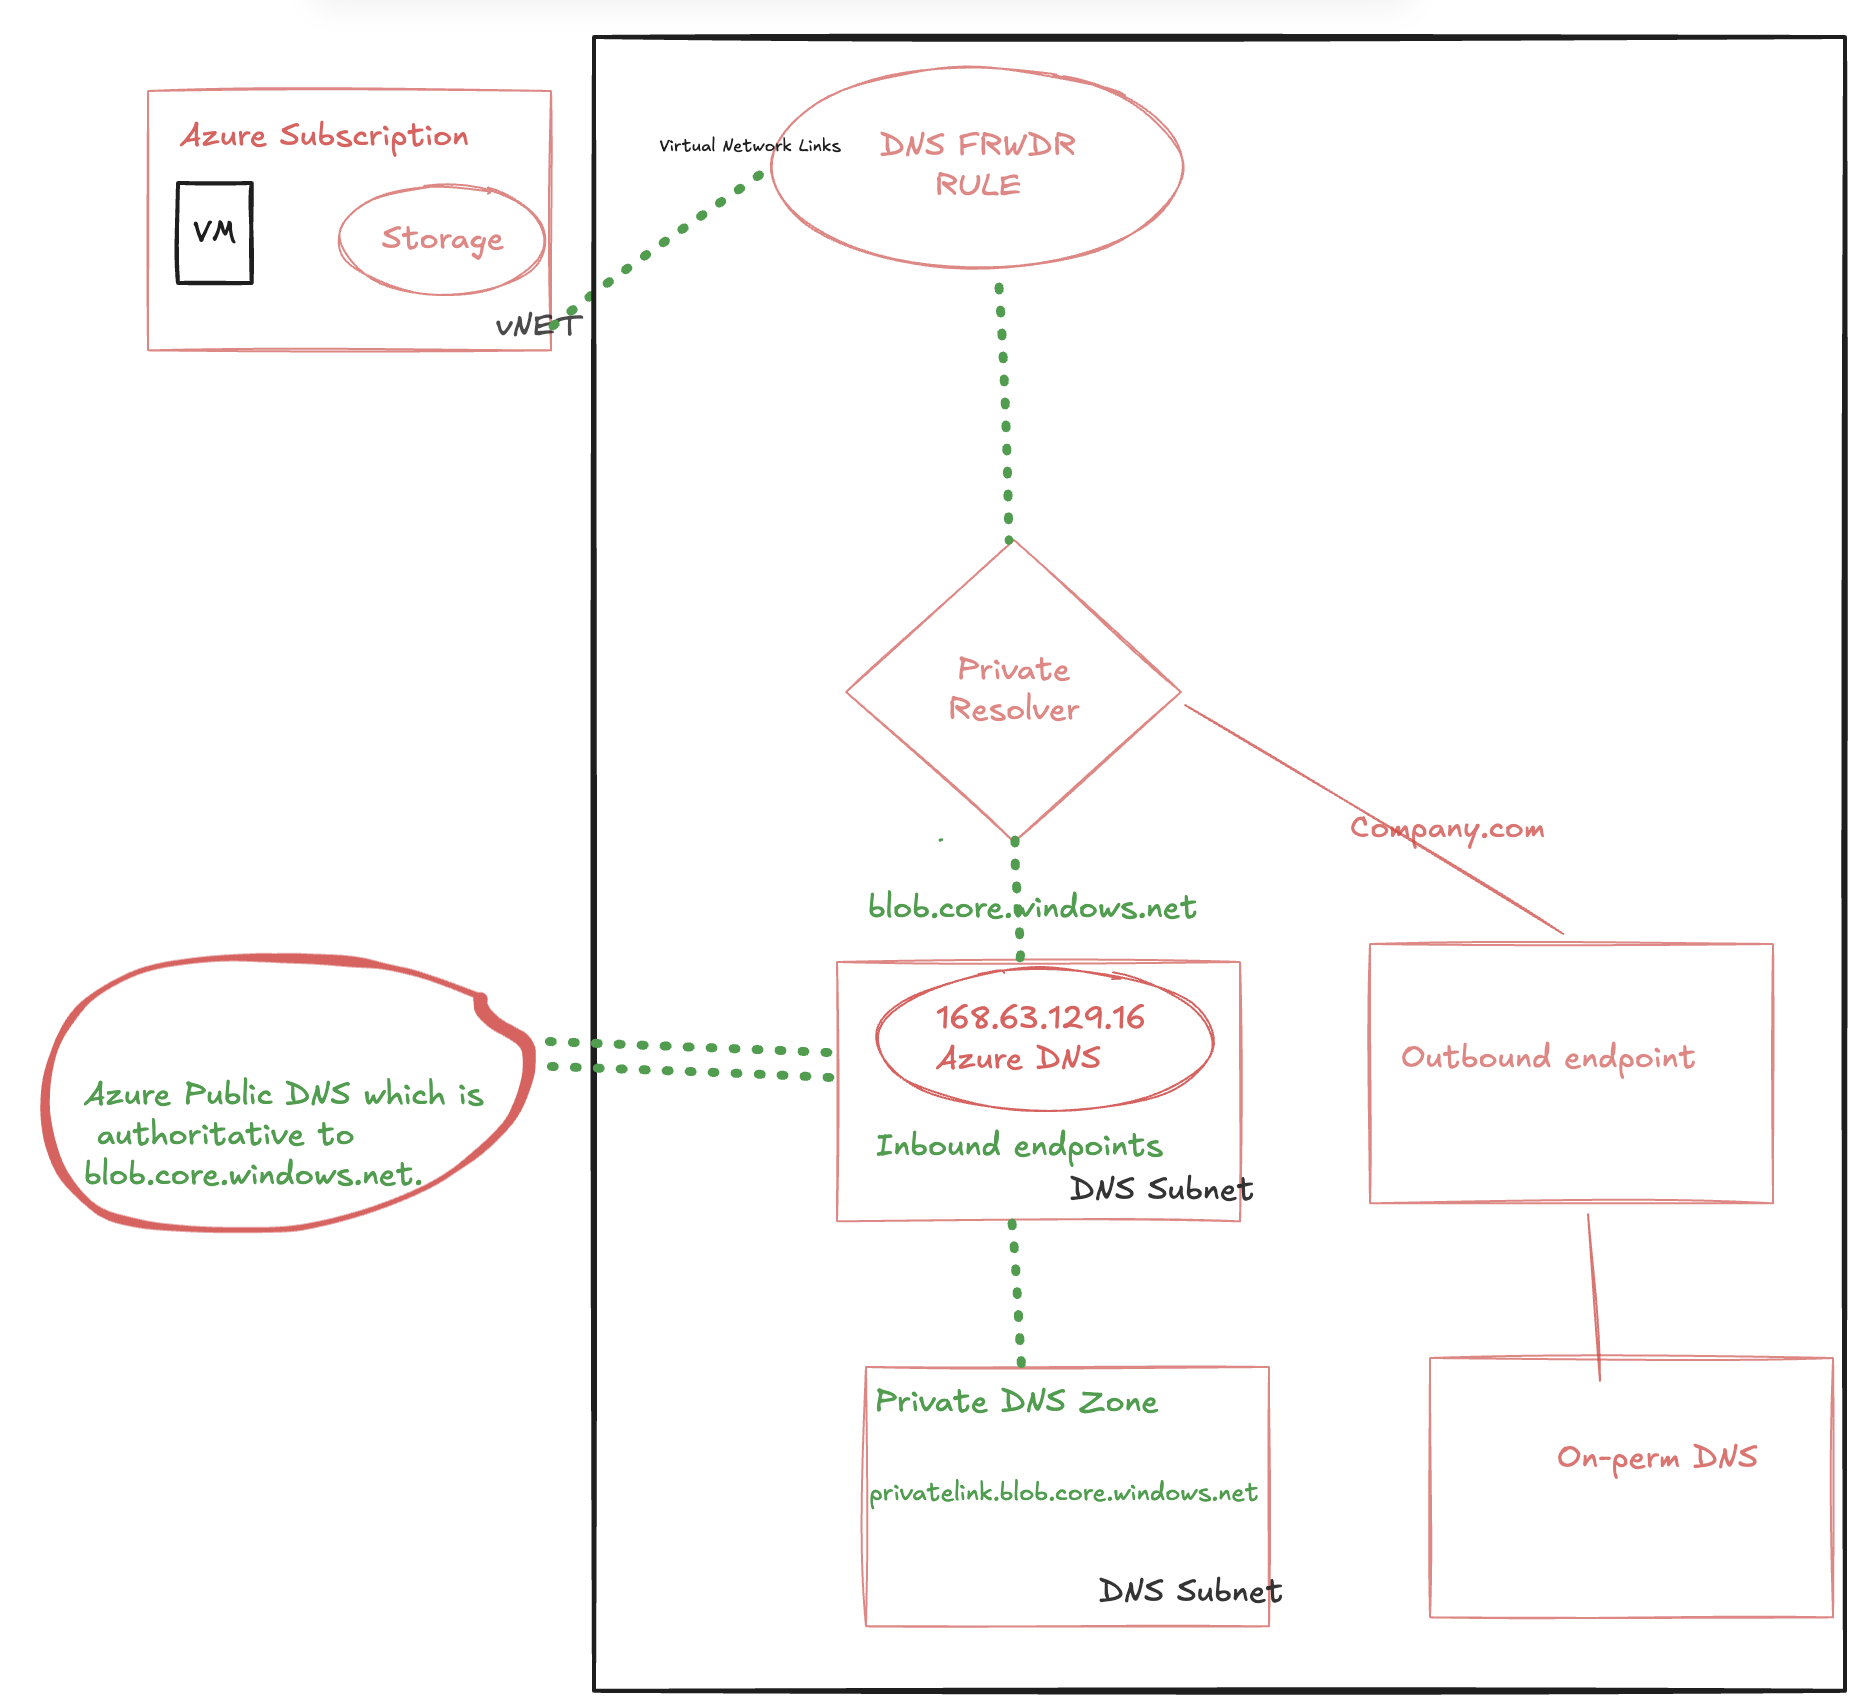
Azure VM resolving the blob.core.windows.net
For the second scenario to access the Azure blob services from the Azure VM, it will route the request to the private resolver in-bound rule and it will resolve to the private DNS zone.
VM sends a DNS query asking for IP associated to test.blob.core.windows.net to Azure Provided DNS 168.63.129.16.
Azure Provided DNS sends query to the authoritative DNS Server that hosts blob.core.windows.net zone and process it.
That authoritative DNS Server responds back to Azure provided DNS in the VNET that with the correct CNAME: test.privatelink.blob.core.windows.net.
Azure Provided DNS is aware that Private DNS Zone hosts privatelink.blob.core.windows.net zone and can process as host name (A record) from gbbstg1 to its private endpoint IP 10.0.0.5.
Private DNS zone returns private endpoint IP back to Azure Provided DNS.
As final step Azure Provided DNS returns private endpoint IP back to the client.
The VM will now be able to access the Storage Account via Private Endpoint IP.
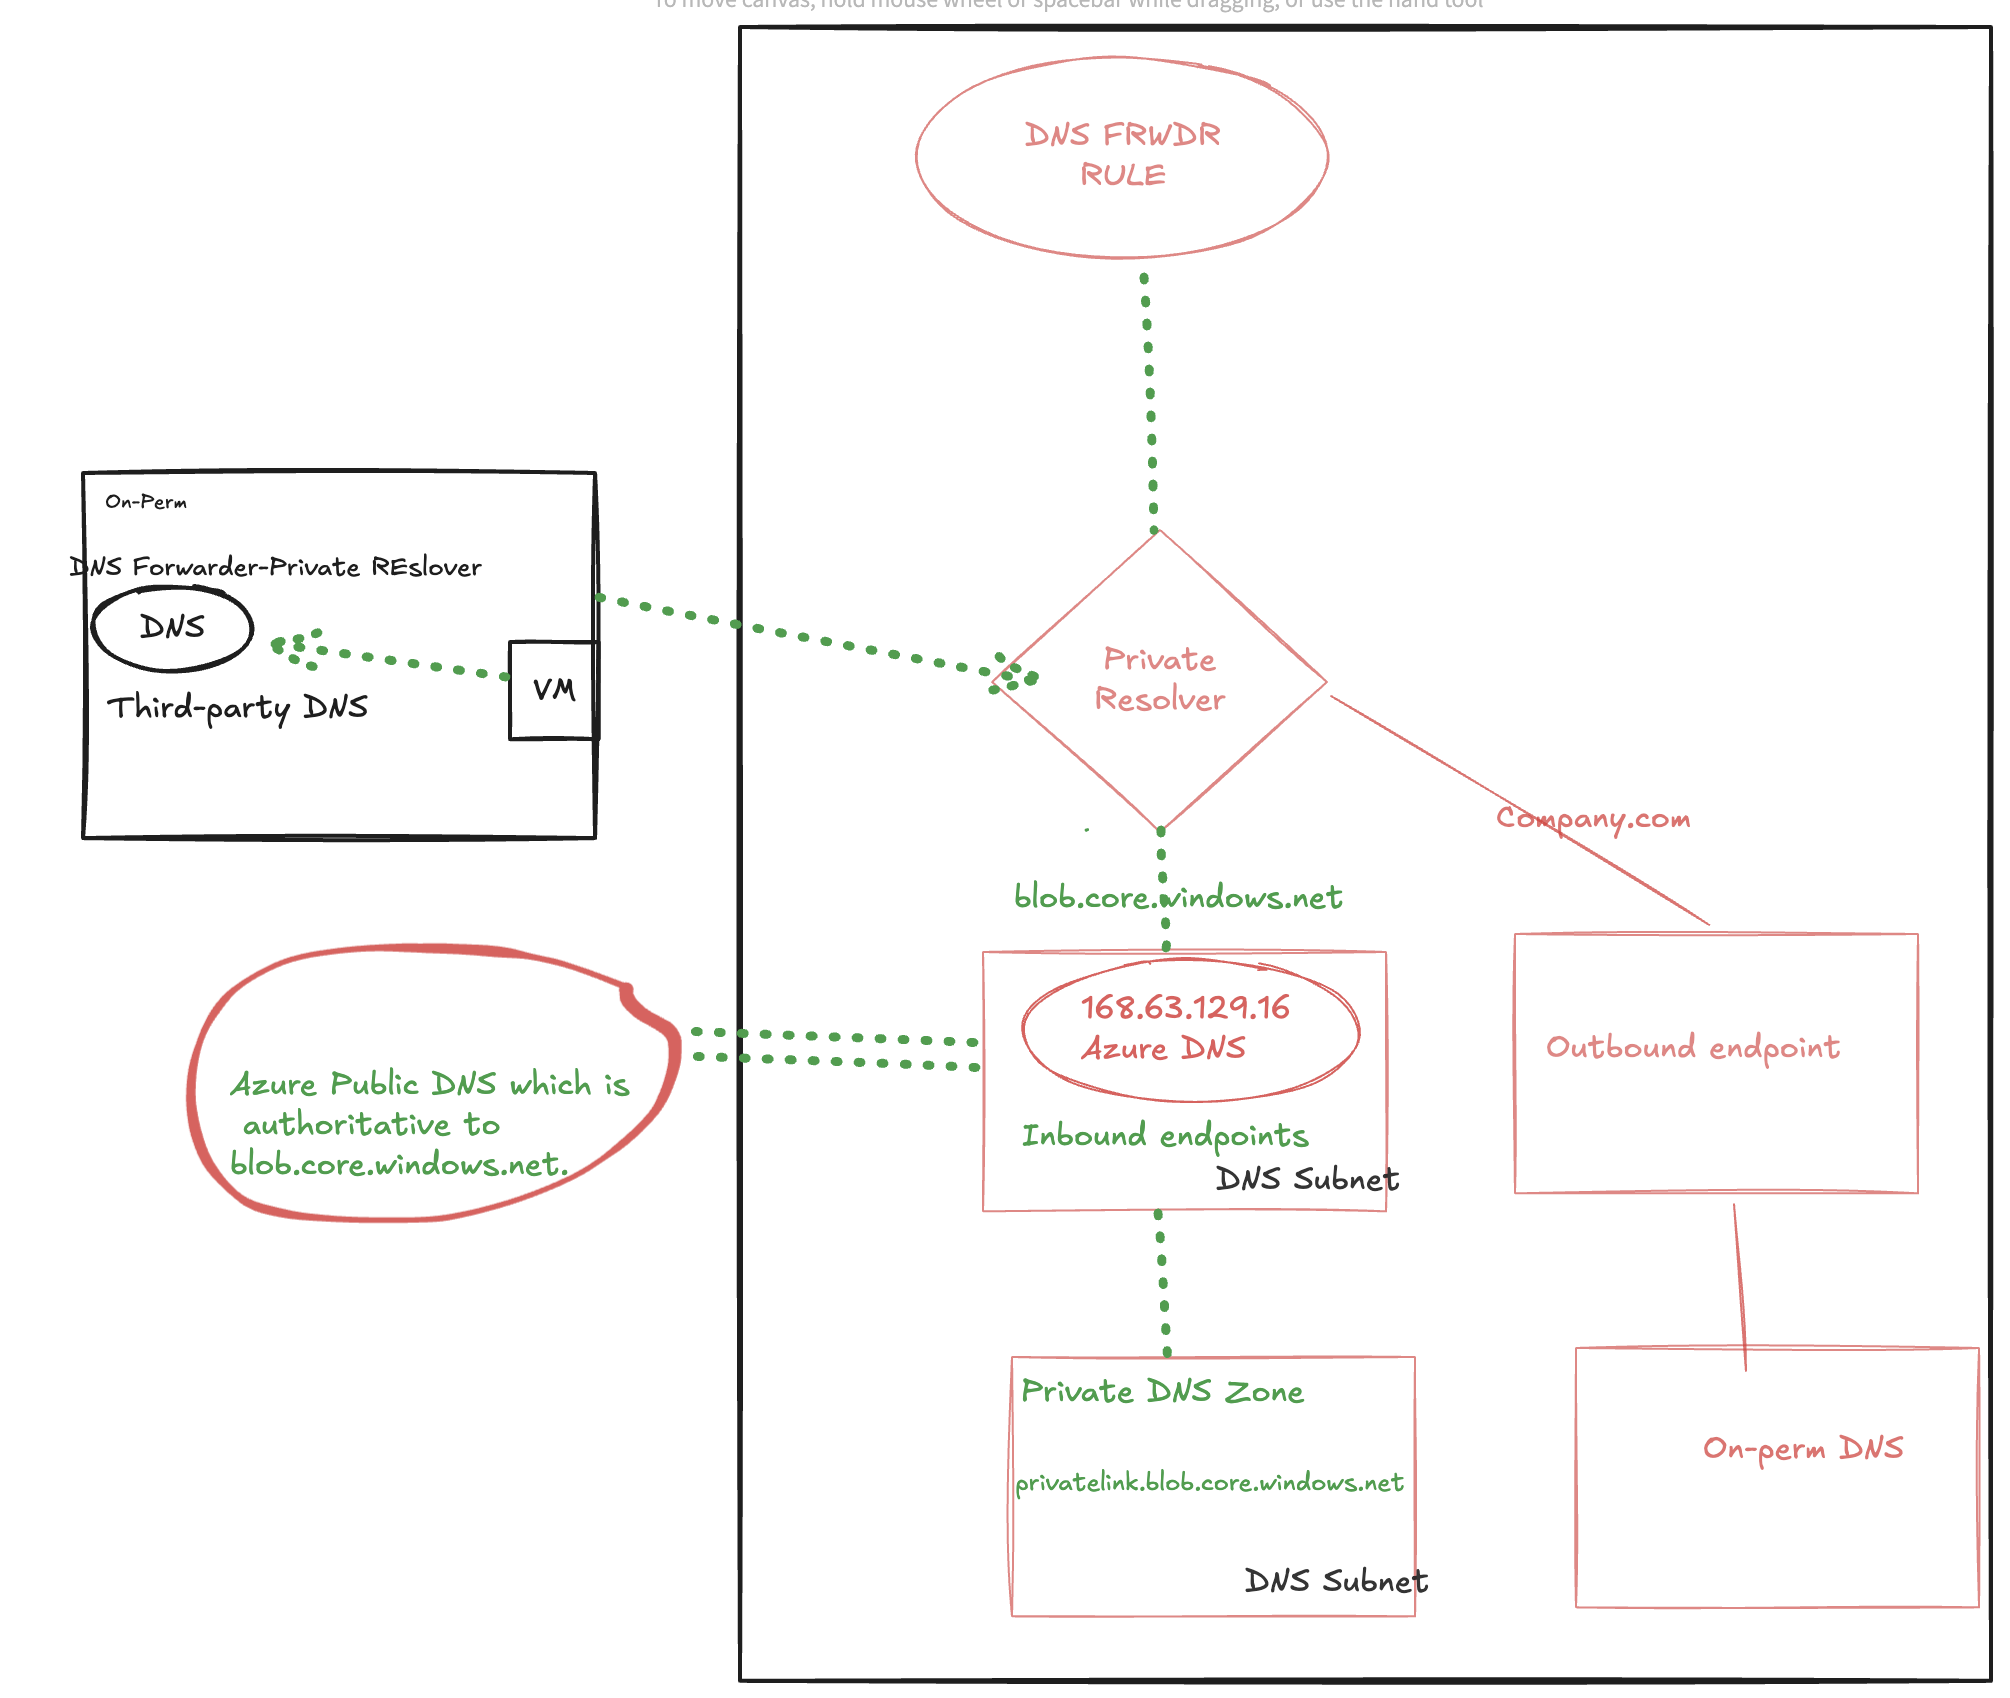
On-perm VM resolving the test.blob.core.windows.net
For the third scenario to access the Azure services like blob from the on-perm.we have configured the forwarder to the private-endpoint IP in our third-part DNS server so any request from the on-perm VM test.blob.core.windows.net, it will forwarde the request to the private resolver and it get resloved.
Above Url will be re-directing to microsoft AD login. There you needs to login with you azure active directary login credentials. This will enable the KubeCtl access to your terminal or shell.
To check and identify which IP is hitting the Azure blob container, we need to enable the logs under Diagnostic settings – Log Analytics workspace – Enable Audit logs \ all logs
Run this query which will show from which agent \ IP and status.
StorageBlobLogs | where AccountName == “Storage_AccountName” | project TimeGenerated, OperationName, CallerIpAddress, UserAgentHeader, StatusCode | order by TimeGenerated desc
calleripAddress is the one shows the IP and If the status if 409 then it is failed request and it shows the IP details
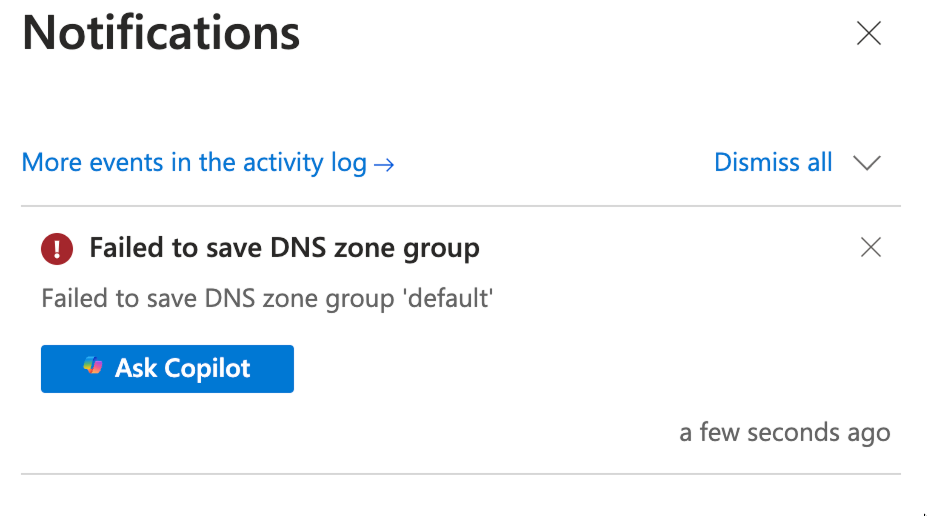
We were facing an issue with running an operation from your Azure Storage Account to create a private DNS zone for a specific private endpoint connection across our DNS subscription. From the logs, we can see an error when trying to apply the configuration to create the private DNS zone.
Upon further checking the logging around this error, I don’t see it being received by the Azure platform; there is no request received by Azure Resource Manager (ARM). This is normally the first hop for operations performed in the portal, Azure PowerShell, or any other command methods. This confirms that the operation was not submitted successfully, likely due to incorrect user permissions over the DNS subscription, as we discussed. This behavior is expected if a permissions issue blocks the request. The validation process that Azure uses first checks roles and permissions and will block the request before an actual request is generated towards the resource. As outlined in the Custom Rule setting, these are the actions required over the DNS subscription for your user account. Reference: Protecting private DNS Zones and Records – Azure DNS | MicrosoftLearn.
Content library service was failing in the firstboot start phase.
The error is pointing out to Content library, from the logs we verified that the cl_metadata table is corrupt.
Solution Recommendation : Edited the vCenter Database, changed the cl_metadata table.
Made changes to the table as follows : database.schema.version | [ “1.0.0”, “1.0.12”, “1.0.24”, “1.0.44”, “5.0.0” ]
2. Deploying the temp instance the network was not available.
Solution Recommendation :
Created a new standard switch
created the related kernel port
create new port group
Now the network was listed in the deployment page
selected this port group during the installation
later edited the NIC for the temp VM and changed to DV switch.
3. vCenter Server has extensions registered that are unsupported by the new vCenter Server. Extensions: NSX Manager (by VMware)
Solution Recommendation : Uninstalled the NSX Plugin
4. TRUSTED_ROOTS has weak signature algorithm sha1WithRSAEncryption.Required with a certificate that uses the SHA-2 signature algorithm.
Solution Recommendation : SHA1 is not supported in vSphere 8.x. Stale entry removal is required as replication partners have to be in a healthy status for upgrade.
5. VMDir Replication between partners is not working.
Solution Recommendation : Due to the Linked mode state with the old retired VC, unregistered the old VC from the upgrade VC.
5. Host profiles with versions lower than 6.7 are not supported by vCenter Server 8.0.0. Upgrade.
Solution Recommendation : Upgrade the host profle.