
Pls check my previous blogs for the DSM , Relay Server , vShield End Point , Filter Driver , DSVA, DSA , SSP Server , Policies and exclusions . In this blog we can see the VMtools Installation with vShield driver in VMs.
After applying the policy and activating it to the DSVA , we need to install the VMtools with vShield Driver to route the VM traffic to the DSVA for the scanning.Already I explained basic requirements and the function of the vShield End Point Driver in my previous vShield End Point blog and now we can see the VMtools installation.
VMware includes the VMware vSheild Endpoint Driver in VMware Tools 5.x but the installation doesn’t install it on the Guest by default. To install it on the VM ,we have three options below.
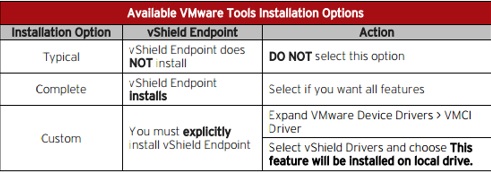
PIC was taken from the Trend doc..
VMtools Installation Steps below.
Interactive Tools Upgrade.
Select the VM from the Vcenter – Right Click – Guest – | Install\Upgrade VMware Tools.

Select Interactive Tools Upgrade.

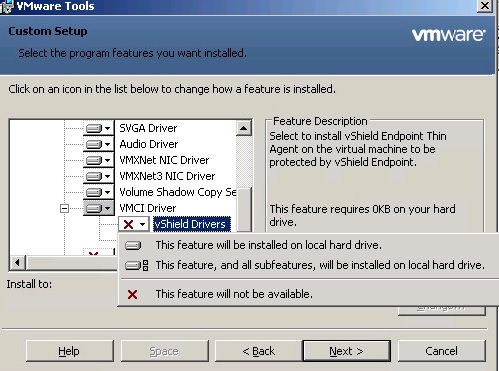
Login to the the Console to the VM and Run setup64.exe from the mounted volume.

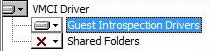
Ensure that you select the option to install the vShield Drivers (Under the VMCI Driver option). This will need a reboot of the VM. This will need a reboot of the VM.


Another Method to install the VMtools.
If it is the existing VM and already had VMware Tools installed but not the vShield Driver then we can install the driver using the following advance option which no need for the reboot.
Select the VM from the Vcenter – Right Click – Guest – | Install\Upgrade VMware Tools.
Select Automatic Tools Upgrade.
Enter the below in Advance Options.
/S /v “/qn REBOOT=R ADDLOCAL=VShield”
/S /v “/qn REBOOT=R ADDLOCAL=ALL REMOVE=Hgfs,WYSE”
or else open the CMD of the guest and Run
setup64.exe /S /v /qn REBOOT=R ADDLOCAL=VShield
By using the PowerCLI script also we can do the same , just got the info from the below reference link and it will be useful to implement on huge environments.
$ComputerName = <vm-name>
$vCenter = <vcenter-hostname>
Connect-ViServer $vCenter
Mount-Tools -VM $ComputerName
$DriveLetter = Get-WmiObject Win32_CDROMDrive -ComputerName $ComputerName | Where-Object {$_.VolumeName -match “VMware Tools”} | Select-Object -ExpandProperty Drive
$ScriptText = “$DriveLetter\setup64.exe /S /v `”/qn REBOOT=R ADDLOCAL=ALL REMOVE=Hgfs,WYSE`””
Invoke-VMScript -VM $ComputerName -ScriptText $ScriptText -ScriptType bat
Same Script can be used on multiple systems by using the below.
$Vms= Get-Content C:\system.txt – ( Mention the Guest system name or IP )
$vCenter = “Vcenter Name”
Connect-ViServer $vCenter
Mount-Tools -VM $vms
$DriveLetter = Get-WmiObject Win32_CDROMDrive -ComputerName $vms | Where-Object {$_.VolumeName -match “VMware Tools”} | Select-Object -ExpandProperty Drive
$ScriptText = “$DriveLetter\setup64.exe /S /v `”/qn REBOOT=R ADDLOCAL=ALL REMOVE=Hgfs,WYSE`””
Invoke-VMScript -VM $vms -ScriptText $ScriptText -ScriptType bat
By using the PStools – Psesex.exe also we can update the vShiled driver on Multiple Computers.
First Mount the drive to the Guest VMs.
Run the Psesex command as below:
@file – PsExec will execute the command on each of the computers listed
in the file.
cmd – To enter in to the remote system CMD and use ” ” double quote to execute the second command.
C:\Data\HCL\PsTools>psexec.exe @c:\data\systems.txt cmd /c “d:\setup64.exe /S /v “/qn REBOOT=R ADDLOCAL=ALL REMOVE=Hgfs,WYSE””
Verifying the Driver Installation.
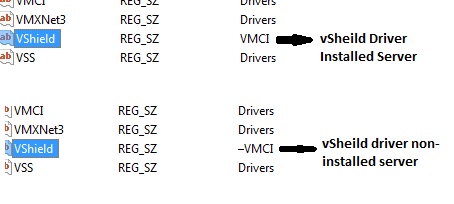
We can also verify the server with vSheild driver installed or not , On the windows registry go to search and look for the VShiled , it will point to the below path.

We can find the installed and non-installed components of the VMtools from the registry , any component ( – ) with the symbol at beginning means its not installed on the server.
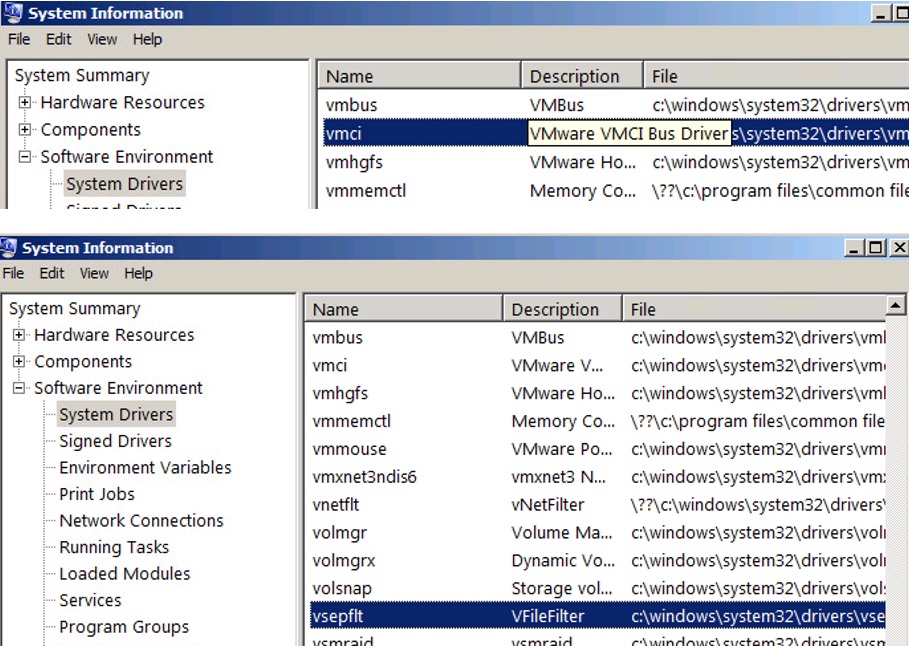
Also under System Information – Driver we can verify the same..
By using the below script we can verify the vshield driver on the guest VMs.(Script was taken from the below reference link )
Save the below content in to the .PS1 extension.
Open the Powercli and Login to the VC and then execute the below script.
.\script.ps1 > output.txt
$vms=GET-VM | Where-Object {$_.PowerState -eq “PoweredOn” }
ForEach($vm in $vms)
{
if (Get-VMguest -VM $vm | Where-Object {$_.OSFullName -like “*Microsoft*”})
{
Invoke-VMScript -VM $vm -GuestUser “username” -GuestPassword “password” -ScriptText “sc query type= driver | find `”vsepflt`” ” -ScriptType bat | format-list vm,name,ScriptOutput
}
}
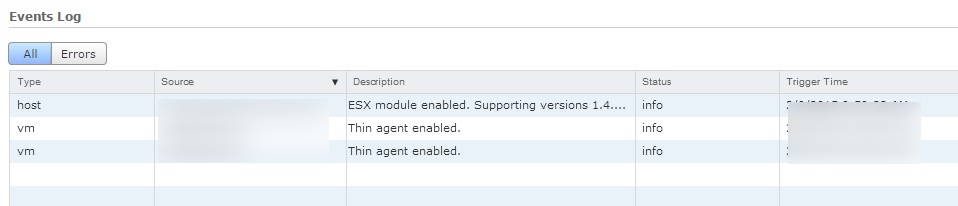
By login to the vShield Manager also , we can check the Thin Agent Enabled VMs.
Logon to vShield Manager – Datacenters – Select the Datacenter – Select the ESX Host – EndPoint tab.
ESXi 5.5 VMware Tools:
In ESXi 5.5 update 2 vSheild driver is renamed to Guest Introspection Drivers in VMtools and as per the VMware it is just the name change and the functions will be the same.
In My Next Blog we can see the Trend Events and log.
Reference : http://www.bonusbits.com/main/HowTo:Add_Vmtools_vShield_Drivers_for_Endpoint_Protection_on_ESX_VM
http://www.unknownfault.com/2014/12/powercli-script-to-query-all-windows.html

