Arguments for first disk – Auto Depoly

vSphere 5.1 added the new feature in Auto Deploy :

Stateless Caching \ Stateful  Install feature .

In this method we can enable the option to save the ESXi Image to an assigned dedicated boot disk and it can be a local disk,a lun or USB .

Stateless Caching:: Apply the host profile to cache the image on a local disk or USB and the boot disk will act as a backup boot device that can be used when PXE boot failure or issue in network layer.

Stateful Installs:: Apply the host profile to cache the image on a local disk or USB and the subsequent boots will be from the boot disk and it no longer uses Auto Deploy.

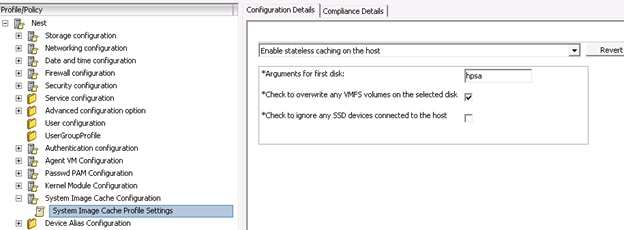
The caching of the image will take place after it running in local RAM , the image is copied to local storage device.Configuration have to be defined within the host profiles settings . Like mentioned in the below pic the arguments for first disk to be mentioned and we can use comma-separated list of disks to use , esx for the first disk with ESX installed on it , model or vendor information or specify the name of the vmkernal device driver. In most environment local will work which points to the local disk and in case if its not accepting the local disk or model then use the esxcfg-scsidevs -a  or esxcli storage core adapter list command to find the kernel device driver .

ad


Arguments for first disk :

ad1


Reference : https://pubs.vmware.com/vsphere-51/index.jsp#com.vmware.vsphere.install.doc/GUID-1901B238-EDA5-440A-B352-8EE48EB0AB48.html

Posted in Auto Depoly, VMware | Tagged , | 2 Comments

SQL server Failover Cluster Instance.

“ The cluster resource ‘SQL Server (SQL2012)’ could not be brought online due to an error bringing the dependency resource ‘SQL Network Name(VSQL2012)’ online “

 During the SQL 2012 Failover cluster installation,  faced the issue on bringing the SQL cluster virtual instance name online and its due to the lack of permission of the main cluster core server name computer object in AD to the  SQL virtual computer object.

sql


sql1


Open the Active Directory Users and Computers and look for the virtual computer object which was created for the SQL cluster resource instance and add the cluster computer object with full permission and try to bring the resource online.

sql2


Posted in SQL server Failover Cluster, Windows | Tagged , , | Leave a comment

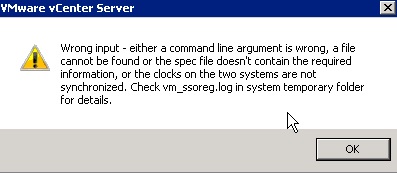
vCenter Server 5.1 fails with the error while we providing the administrator group “Wrong Input – Either a command Line argument is Wrong “

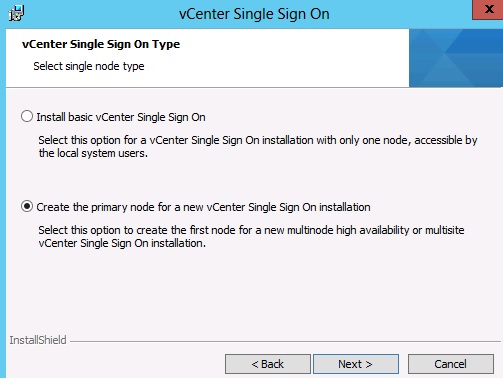
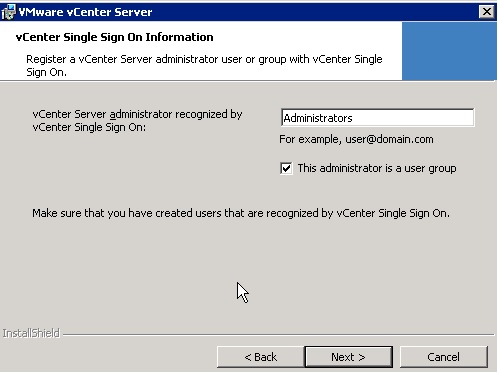
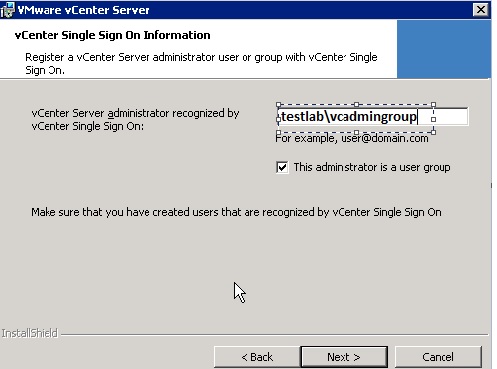
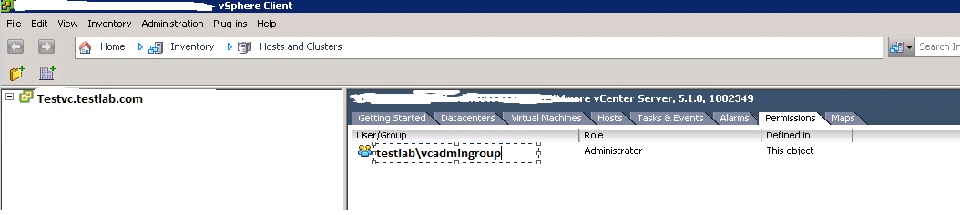
During the VC SSO installation I was facing the error “Wrong Input – Either a command Line argument is Wrong “ and I found if HA SSO service is selected as High Availability mode then  instead of local administrative group we need to mention the appropriate AD group or AD user which is recognized by the SSO .Once the installation is completed , members from the AD group can login to the VC using the client..

SSO HA Mode.

sso

We shouldn’t provide the local group.

sso1

sso3

We need to provide the appropriate AD group and the members of the group can login to the VC.

sso4

sso5


Reference :

http://www.jonathanmedd.net/2013/06/vcenter-server-5-1-installation-fails-with-wrong-input-either-a-command-line-argument-is-wrong.html
Posted in SSO, VMware | Tagged | Leave a comment

Resetting iDRACs (Dell M1000e)

In some cases  we need to reset the iDRAC to fix the issue and CMC ( Chassis Management Controller ) allows to reset the iDRAC without re-booting the OS.

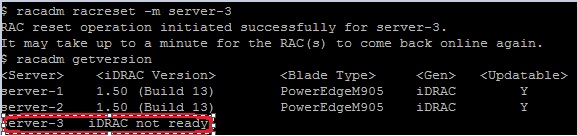
Login in to the CMC Chassis Managment Controller through RACADM using SSH and run the below command racadm getversion. It will list the server details.

IDRAC


Run the command racadm racreset –m < Choose the server to reset > .

IDRAC1

We can reset multiple iDRAC also by racadm racreset –m server-1 –m server-2 –f .


Reference : https://www.youtube.com/watch?v=bScMZJQQ5Oc

Posted in Dell | Tagged , , | 2 Comments

Update Manager with multiple vCenter Server instances.

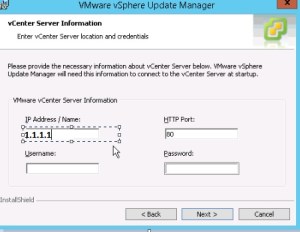
By default VUM ( VMware vSphere Update Manager )  supports only one VC instance and  it can’t support multiple VCs simultaneously but having the VUM utility we can re-configure the second VC separately to use the same update manager .

This method is not supported by VMware and in case of serious SQL licensing issue or other cost factor,  we can try this method to use the single VUM for multiple VC instances and in my lab I have configured two VCSA ( Vcenter Appliance  ) and updating the host using the single same VUM.

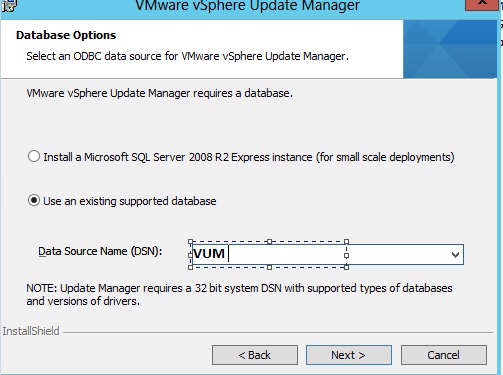
Intial stage of the VUM  installation itself we have to configure the vCenter instance and based on the size of the inventory we have to chose the Database , The Update Manager server and Update Manager Download Service require a database to store and organize server data. Its recommended to have the separate VUM database from the VC and VC database. Before installing the Update Manager server, you must create a database instance and configure it to ensure that all Update Manager database tables can be created in it. If you are using Microsoft SQL Server 2008 R2 Express, you can install and configure the database when you install Update Manager. Microsoft SQL Server 2008 R2 Express is used for small deployments of up to 5 hosts and 50 virtual machines.

Although you can install the Update Manager server only on 64-bit machines, Update Manager is a 32-bit application and requires a 32-bit DSN.

vum

VUM3

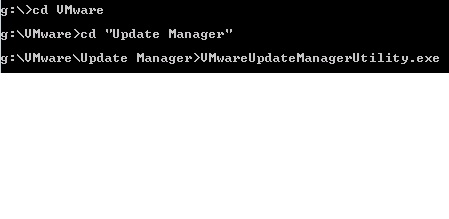
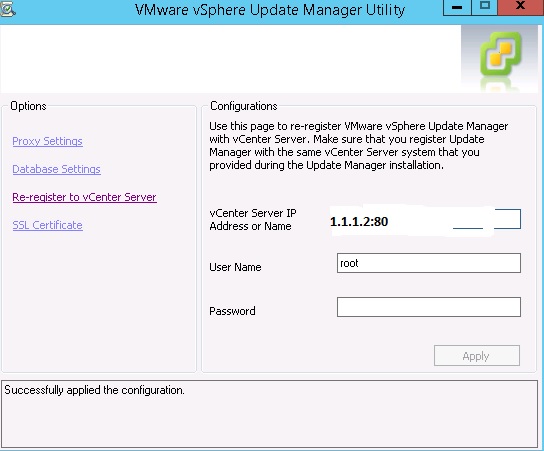
VUM has a utility called VMwareUpdateManagerUtility.exe in which we can re-register the vCenter Server . For EX we can install the VUM plugin to the first VCSA 1.1.1.1 and  update the ESX host. Later we can re-configure the VUM by running the utility and it will ask for the option to give the VC name or IP in which we can provide the second VC IP address .

VUM2  VUM4

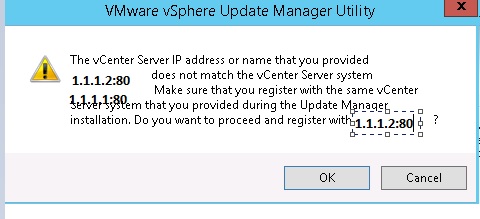
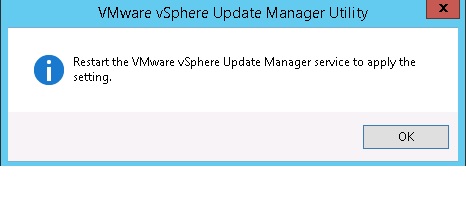
Once we provided the VC IP it will show the warning and we have to accept and reboot the VUM service on VUM server.

VUM5

vum6

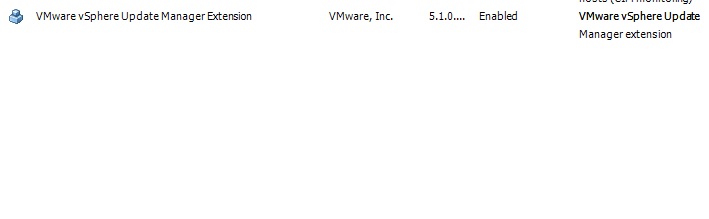
By login to the VC we can find the VUM plugin on the second VC , Since VUM uses the same DB we can find the same baseline which was configured on first VC or else we can create the new baseline for the newly connected VC.


vum7

At the same time on the first VC , it will show the below error on connecting the VUM plug-in and if we want to update the host running on first VC again re-configure the same steps with the VC IP or Name.

vum8


Reference : https://pubs.vmware.com/vsphere-51/index.jsp#com.vmware.update_manager.doc/GUID-B5FB88E4-5341-45D4-ADC3-173922247466.html
 

http://kb.vmware.com/selfservice/microsites/search.do?language=en_US&cmd=displayKC&externalId=2011327


Posted in Update Manager, Vcenter Appliance, VMware | Tagged , , , | 3 Comments

Reset the HP Blade in the Enclosure

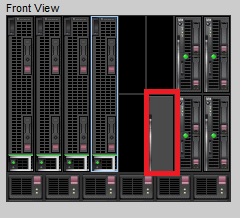
When physical access to the server is unavailable and blade is not responding properly from the enclosure, try to do the  basic troubleshooting like reboot and if it is failed to fix the issue then it require blade to be removed and reinserted, use this command to reset the blade .

Login to the OA using putty and run the command reset server X <X = Bay No > , it will reset the particular bay.

hp

Hp2

Note : Pls make sure the exact bay number before running the command and also there is no I/O in the attached storage device.

Posted in HP | Tagged , , | 2 Comments

Removing the VNIC completely from the Windows VM.

We removed the VNIC E1000 and added a new NIC with VMXNET3 on one of the windows 2008 VM , noticed that windows doesn’t delete the hardware and it just moved as a hidden device.

After spending some time , I got the below method to remove the NIC Completely.

Open the CMD ( Run as Administrator )

Run the below commands

  • SET DEVMGR_SHOW_NONPRESENT_DEVICES=1
  • START DEVMGMT.MSC

Untitled

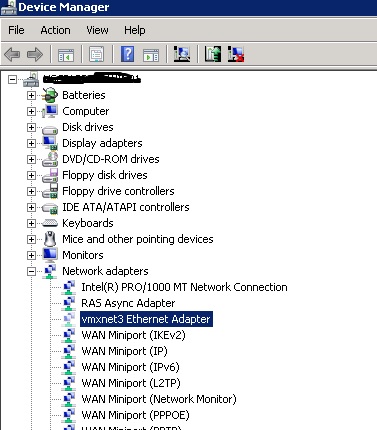
Make sure to open the device manager using the CMD Prompt.

Go to View and Select “Show Hidden Devices”.

Select Network Adapters and we can see VM NICs which was removed and it will be grayed out.

Right Click and Uninstall.

Untitleed

Reference : JERAMIAH DOOLEY  Blog and Microsoft Windows Article .

Posted in VMware, Windows | Tagged , , , | 1 Comment

Easy way to Configure and run commands on multiple ESX hosts in the cluster.

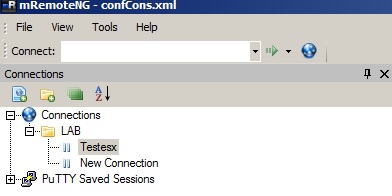
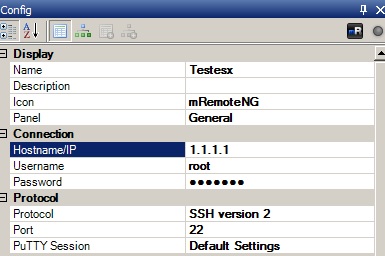
Download the tool called mRemoteNG in which you can take multiple ESX hosts SSH session on one window and also we can save the ESX details for future use.

http://www.mremoteng.org/download

Pls check terms and conditions on the link to use this tool on PRD.

d

U

ed

For example if we want to configure the NFS Datastore on multiple ESX hosts then copy and run the Esxcfg-nas  command on all the ESX host sessions.   Esxcfg-nas –a –o Storage Filer IP or Name –s /vol/Volume Name  Datastorename.Like this we can configure the vSwitch or other settings very easily on multiple ESX hosts which saves time and manual work.

Posted in ESXi Tools, VMware | Tagged , , , | 1 Comment

Configuring Identity Source in SSO with secured LDAPS

To configure the LDAPS , need to import the certificate from the certificate root server . Pls note other than the root certificate it won’t accept other certificate .

Log in to a Domain Controller on the domain.

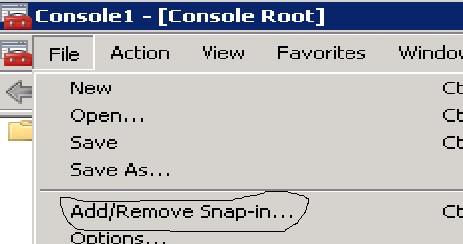
Click Start, type mmc, and click File > Add/Remove Snap-in.

2

Select Computer account and click Next.

3

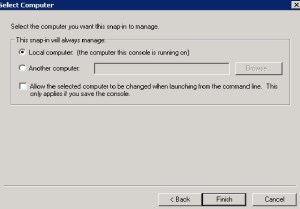
If you are working at the LDAP server requiring the certificate, select Local. Otherwise, select Another computer and click Browse to locate the LDAP server requiring the certificate

When you select the correct computer, click OK > Finish

4

Click Certificates > Add.

5

Click on the root certificate

In the console tree, expand Certificates (computer)

In the certificates console of a computer that contains a certificate that can be used for Server Authentication, right-click the certificate, click All Tasks > Export.

6

Make sure to select the Server Authentication on the certificate .

7

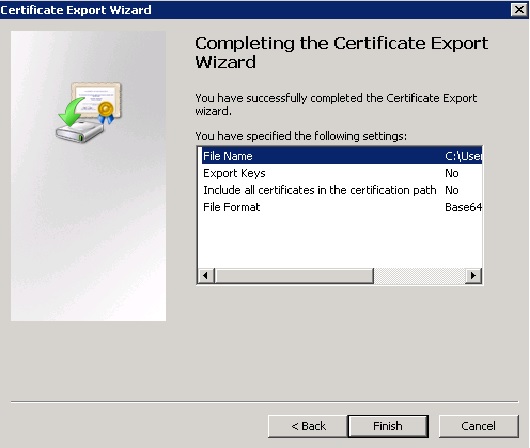
On the Export Private Key screen, select No, do not export the private key and click Next.

8

On the Export File Format screen, select Base-64 encoded X.509 (.CER) and click Next.

9

On the File to Export screen, choose a name and location to save the certificate.

10

Click Next and Finish to save the certificate file.

11

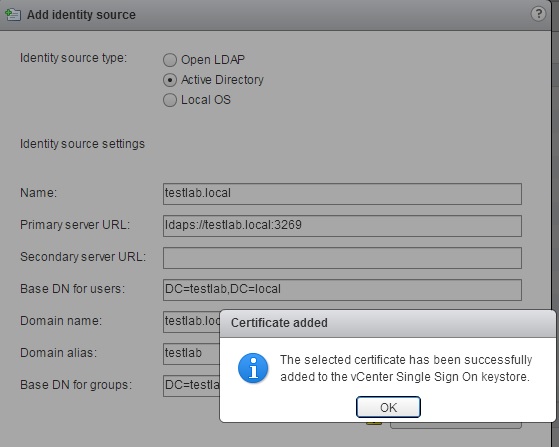
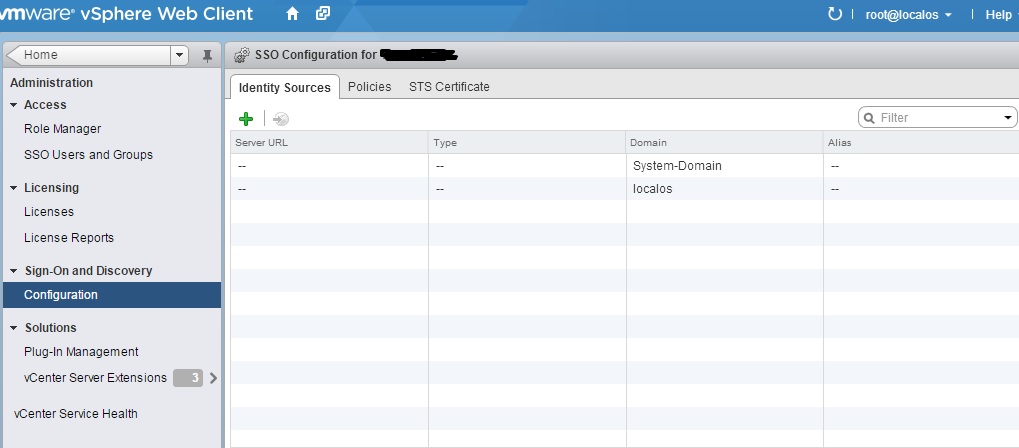
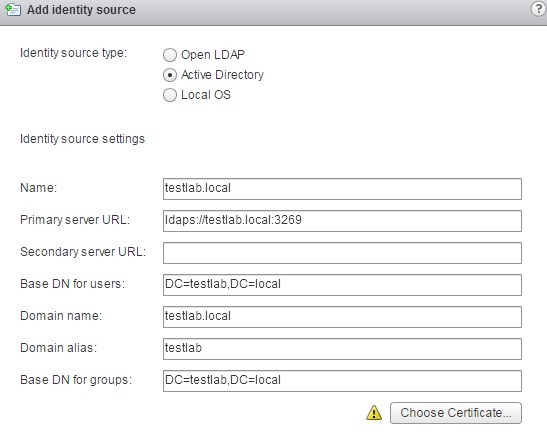
Log in to the vSphere Web Client using an Single Sign On Administrator. The default account is admin@System-Domain.Click Administration and go to the Sign On and Discovery section, click Configuration, then click the green Add Identity Source option at the top.

12

Enter the required information in the Add Identity Source wizard. When completed, click Choose Certificate and browse to the location of the Certificate you saved previously.

13

You receive a confirmation message when you have imported the certificate successfully. Click OK to close the dialog and OK again to finalize adding the new identity source.

14

15

16

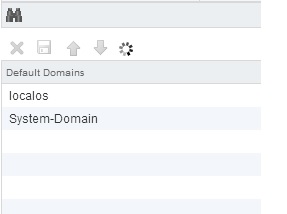
If you want to include this new Identity Source in the Default Domains, select the Identity Source from the list and click Add to Default Domains icon .

17

Once Identity source is configured with AD as the default domain , login in to the web-client or vsphere client and add the ADD users to the appropriate rights to the VC..

Additional Information Regarding the SSO Identity Source.

We can configure the identity source just for LDAP in the non-secured AD Ladp environment and the default port used is 3268.

18

A general system error occurred: Authorize Exception error :

In few cases above error will popup when we login  using Domain users to connect VC and it will allow only local admin account , it mostly because of SSO Identity source ldap wrong configuration or any change in the AD Ldap end .So check the configuration above to fix the same..

Reference :http://kb.vmware.com/selfservice/microsites/search.do?language=en_US&cmd=displayKC&externalId=2041378


Posted in SSO, Vcenter Appliance, VMware | Tagged , , , , | 1 Comment

How to remove vSAN labeled SSD Disk to use it as local datastore.

First we need to remove the disk from vSAN configuration.

/dev/disks # ls –l   – It will list all the disks

Need to note the device name which can be naa.* or mpx.* depends on our ESXI host identifies the disk, By using the partedUtil command we can check the partition found on the disk or we can use fdisk –l and if it shows 1 then it means the disk is in vsan.

4

Fdisk –l

Number  Start (sector)    End (sector)  Size       Code  Name

 1            2048            6143        4096   0700

2            6144       937637518        894M   0700

esxcfg-scsidevs –l

esxcli vsan storage list |less

esxcli vsan cluster get – It will show any cluster is enabled for VSAN

esxcli vsan storage remove -s [SSD-DEVICE-ID]

In some cases it will show the below error while removing the disk from the SSD.

5

Host reboot will help or else we need to run the below command to remove the disk label as vSAN. It will write Zeros to the first 32MBs of the disk allowing it to be written.

dd if=/dev/zero of=/vmfs/devices/disks/naa.6005*** bs=1M count=32 conv=notrunc

Reference : http://www.virtuallyghetto.com/2012/04/removing-previous-local-datastore-label.html
Posted in VMware | Tagged , , | Leave a comment