Configuration of NSX 6.1.4 Manager – Part 2

Pls check my previous blog for the deployment of the NSX 6.1.4 OVA and here we can see the configuration of the NSX Manager.

Browse to the HTTPS IP address which we assigned during the OVA deployment and login using the user Admin and Password.

NSX13

NSX113

We can see two entries , Lookup service and vCenter Server .

Lookup Service : For vCenter versions 5.1 and above, you may configure Lookup Service and provide the SSO administrator credentials to register NSX Management Service as a solution user. It is also recommended to set the NTP server for SSO configuration to work correctly.

22

vCenter Server :

Connecting to a vCenter server enables NSX Management Service to display the VMware Infrastructure inventory. HTTPS port (443) needs to be opened for communication between NSX Management Service, ESX and VC. For a full list of ports required, see section ‘Client and User Access’ of Chapter ‘Preparing for Installation’ in the ‘NSX Installation and Upgrade Guide’.

If your vCenter server is hosted by a vCenter Server Appliance, please ensure that appropriate CPU and memory reservation is given to this appliance VM. After successful configuration of vCenter on NSX Manager, you need to log out of any active client sessions on vSphere Web Client and log back in to enable NSX user interface components.

 1Untitled

Use the service account to connect the vCenter and the same account will be added to the NSX Manager.

ed_censored

Once we connected to the VC , wait for few mins and login to the vCenter web client .

Under Network & Security we can see the NSX Manager and its configuration.

network

Untitlehhd

Click NSX Manager – Manage – Users and add the users or group to have NSX Manager Access and select appropriate role .

Uw11   qed

Auditor : Users in this role can only view system settings and auditing, events and reporting information and will not be able to make any configuration change

Security Administrator : Users in this role can configure security compliance policies in addition to viewing the reporting and auditing information in the system.

NSX Administrator : Users in this role can perform all tasks related to deployment and administration of this NSX Manager instance.

Enterprise Administrator : Users in this role can perform all tasks related to deployment and configuration of NSX products and administration of this NSX Manager instance.

Posted in NSX 6.1.4, VMware | Tagged , | Leave a comment

NSX Manager 6.1.4 Installation OVA – Part -1

It is preferred to install the OVF\OVA using the webclient but in this blog we can see the OVA deployment using the vClient .

Download the latest version and navigate to the location to select the OVA..

nsx

Next it will show the OVF Template Details .

NSX2


Accept the License Agreement.

NSX 3


Select the Name and the Inventory Location.

NSX4

Select the Host / Cluster.

NSX5

Select the Resource Pool

NSX6

Select the Storage \ Disk Format

NSX7

Network Mapping – Select the appropriate Network.

NSX 8


Next provide the Admin Password \ Host Names \ DNS \ NTP Details.

NSX 9

Once all the configuration is done , It will show the configuration details..

NSX 10

NSX11

Login in to the VM Console and also the web client to verify the configuration.

NSX12

Next Blog we can see the configuring the vCenter Server to the NSX Manager.


Posted in NSX 6.1.4, Vcenter Appliance, VMware | Tagged , , | Leave a comment

VMware Web-Client issue in chrome browser

Web-Client VM console getting failed, when I try to open it using the Chrome browser ( VCenter Appliance 5.5 build 2442330 ) . It says page can’t be found. At the same time it was working fine in Firefox.

As per the VMware the issue is because of Chrome 42 is disabling NPAPI plugin by default where as in Firefox is  continuing to support NPAPI. Internet Explorer did once, but dropped it in version 5.5 Service Pack 2.

Also VMware recommended to enable the option in our chrome browser:

chrome://flags/#enable-npapi

This will bring the NPAPI options, select enable and restart your browser.
11d

Once I enabled the NPAPI option and rebooted the browser , able to access the VM console.

Reference:

http://arstechnica.com/information-technology/2015/04/14/chrome-starts-pushing-java-off-the-web-by-disabling-plugins/

Posted in Vcenter Appliance, VMware | Tagged | Leave a comment

Deploying Platform Services Controller ( PSC ) in HA mode behind a Load Balancer.

In this blog we can see the configuration of High Availability External Platform Services Controller ( PSC ) Appliance .A fresh, or new, vCenter Single Sign-On high availability deployment is recommended when there are multiple vCenter Server systems or vCenter Single Sign-On enabled solutions that require a high level of uptime.When deploying the Platform Services Controller externally for multiple services, availability of the Platform Services Controller must be considered. In some cases, simply having the Platform Services Controller located in a vSphere cluster with VMware vSphere High Availability enabled is sufficient. In other cases, having more than one Platform Services Controller deployed in a highly available architecture is recommended. This requires a network load balancer.

tee

PIC is from VMware.

Mount the vCenter Server 6.0 Appliance ISO to a Windows VM and Install the Client Integration Plugin.

Node1 : PSCSSO1.domain.local

Node2: PSCSSO2.domain.local

LB: PSCSSO.domain.local

Double Click the vcsa-setup.html and once the plug-in is opened then Click Install.

Ufntitled

Accept the terms of the license agreement and Click Next

Select a Target ESXI Host to Deploy the Appliance.

Ufntitdled

Click YES to accept the host’s Certificate

Enter an Appliance name and the root OS Password which we want to assign.

1d

Select the Install Platform Service Controller Option under “ External Platform Service Controller “

Uflegd

Select Create a new SSO Domain and enter an administrator vCenter SSO Password; enter an SSO Domain name such as vsphere.local and an SSO Site name such as a city or physical location name

fUntitled

Next Select the Datastore with the Thin Disk Mode.

led

Choose the Network and see my blog for the Ephemeral Port details.

ff

1ntitled

Once the Installation is done then start the second Node.

Do the above steps and select the option to Join an SSO in an Existing configuration.

titlefd

Select the Join an existing site

ftitled

tgled

Once the Installation is done ,we need to prepare the Nodes for the load balancer configuration.

SSH into the Node 1 PSC appliance and enable the Shell  with the below commands

Shell.Set –enable=true

Shell

Download and copy unzip the vCenter Single Sign-On high availability scripts SSO-HA.ZIP File.

Create the directory sso-ha.

mkdir /sso-ha and unzip VMware-psc-ha-6.0.0.2503195.zip

gd

Change in to the Directory /sso-ha and run the below command.

python gen-lb-cert.py –primary-node –lb-fqdn=<loadbalancerfqdn> –password <certpassword>

loadbalancerfqdn – LB virtual IP for load-balancing the PSC.

fw

lehd

Ugntitled

Create a forward and reverse DNS entry for the VIP created to load balance the Platform Services Controller traffic

Now Login in to Node 2.

Create the below folders.

Mkdir /ha and/ha/keys and from the first node copy the /sso-ha , ha and also the keys ( /etc/vmware-sso/keys )- Pls check SCP to the vCSA details .

t1itled

Verify all the Files

Udntitled_censored

Run the Following command from the Node 2.

python gen-lb-cert.py –secondary-node –lb-fqdn= –lb-cert-folder=/ha –sso-serversign-folder=/ha/keys/

lb-fqdn – LBFQDN is the load balancer’s VIP used for load balancing the PSC.

PSCSSO.domain.local

1d_censored

On one Platform Services Controller, update the endpoint URL by running

where FQDNofLocalMachine is the FQDN of the machine where the script is being run, loadbalancerFQDN is the FQDN of the load balancer’s VIP used for load balancing the Platform Services Controllers, SSODomain is the vCenter Single Sign-On domain (by default vsphere.local), and password is the password for the vCenter Single Sign-On administrator. The password parameter is optional; if not specified, you will be prompted for it.

q_censored

Once all the configuration is done then create a pool for ports 443,2012,2014,2020,389 and 636.Also choose the health monitors to use TCP and Load Balancing Method to Round Robin.

Update 03\25\2016.

Additional info to maintain the PSC

Platform Service Controller Appliance 6.0 /storage/log fill up .

During rotation of the SSO log files the old log file is not compressed leaving multiple large files stored in /storage/log.

Resolution : There is no fix for this issue and VMware initially they asked to delete the files and now they updated the KB with workaround.

To work around this issue edit the log4j.properties file to change the log file settings.
  1. Connect to the vCenter Server Appliance console and log in using root credentials.
  2. Run this command to enable access the Bash shell:shell.set –enabled true
  3. Type shell and press Enter.
  4. Navigate to the log4j.properties file location with this command:cd /usr/lib/vmware-sso/vmware-sts/webapps/sts/WEB-INF/classes/
  5. backup the log4j.properties file with this command:cp log4j.properties log4j.properties.bak 
  6. Open the log4j.properties in a text editor:vi log4j.properties
  7. Search under the log4j.appender.LOGFILE.File=${catalina.base}/logs/vmware-identity-sts.log section for log4j.appender.LOGFILE.MaxFileSize=100MB and change the size to 50MB.For example:log4j.appender.LOGFILE.MaxFileSize=50MB
  8. Search under the log4j.appender.LOGFILE.File=${catalina.base}/logs/vmware-identity-sts.log section for log4j.appender.LOGFILE.MaxBackupIndex=10 and change the backups to 5.For example:log4j.appender.LOGFILE.MaxBackupIndex=5
  9. Search under the log4j.appender.PERFLOG.File=${catalina.base}/logs/vmware-identity-sts-perf.log section for log4j.appender.PERFLOG.MaxBackupIndex=10 and change the backups to 3For example:log4j.appender.PERFLOG.MaxBackupIndex=3
  10. Restart the STS service using this commandservice vmware-stsd restart
  11. Navigate to /storage/log/vmware/sso/ with this command:cd /storage/log/vmware/sso/
  12. Remove the old localhost_access_log and vmware-identity-sts log files with these commands:rm localhost_access_log.*
    rm vmware-identity-sts.*


Pls check my another blog on F5 Load Balancer Configuration on PSC

Reference : http://www.vmware.com/files/pdf/techpaper/vmware-vcenter-server6-deployment-guide.pdf

Posted in Certificate, High-Availability, Platform Services Controller (PSC ), SSO, vCSA 6.0, VMware | Tagged , , , | 2 Comments

Trend Micro Deep Security 9.5 ( Service Pack 1 and Relay Server Upgrade ) – Part 13

Pls check my previous blogs for the DSM , Relay Server , vShield End Point , Filter Driver,DSVA, DSA , SSP Server , Policies and Exclusions , Events and Monitoring , VMtools and VDI Environment with Agent Protection and Agentless Protection.In this blog we can see the Trend DPM Service Pack Upgrade and Relay Server Upgrdae.

Before starting the activity take the backup of the DPM and also if we have multiple node then stop the service on one node and upgrade the activity on the second node.

Browse to the Trend Download Center.

SP

Select the “Server and Storage” – Deep Security Manager.

Un


Download both the Product Update \ Patch.

Untit


Untitl

Once the Download is done then start the Product Update Installation .

Utled

It will show the current version and the latest upgrade version.

pptitled

It will un-install  the previous version and start updating the new version.

Unned

qswwed

Once the Product Update is done, Start the critical Patch Installation.

wwntitled

ww

aww

Untd

It will show the upgrade version.

Untds

ppd

Installation has been completed.

ppsd

Untid

Verify all the settings then start the Installation on the Node 2 .

Untidd

If the Node -2 shows the below warning while installing the Product update then skip the same and directly install the critical patch and follow the same step.

UntissddUntissdsd

sdsd


Relay Server Upgrade .

Verify all the settings on both the nodes and reboot both the nodes to make sure service is coming up without any issue. Once done all the verification then start upgrading the Relay Server.

Click on Upgrade Agent.

relayed


tled

tlaed

sdsda

Posted in Trend Micro Deep Security | Tagged , , , | Leave a comment

Free Sexilog to view the Syslog and Events

Great tool for free and I will explain the basic configuration and the Installation part of the Sexilog.

Download the SexiLog from

http://www.sexilog.fr/quickstart/

Deploy the Appliance in to the vCenter.

sexilog1

sexilog2

By Default it will be in the DHCP Mode and we can Change it to the Static IP.

1

Press 5 for the Network Seetings

Provide the IP\NetMask\Gateway\DNS\Hostname and reboot the Appliance.

2

Once its done then configure the ESXi  Host to send the log to your SexiLog appliance by adding the udp://IP_address_SexiLog_Appliance:514 in the advance option syslog.global.loghost.

d

p

The default root password is Sex!Log.

The SexiLog web interface (ie Kibana) is listening on TCP port 80 so you can reach it at http://your_appliance_fqdn_or_ipv4/


sexilog_censored

Reference : http://www.sexilog.fr/quickstart/


Posted in Tools, VMware | Tagged , | Leave a comment

Deploying a Centralized VMware vCenter Single Sign-On 5.5 with Microsoft Network Load Balancer.

This blog is about configuring the vCenter SSO LB using the Microsoft Load-Balancing Manager , I have noticed that lot of blog and KB mentioning about the configuration of the LB using F5 , Citrix NetScalar and VMware Edge but not using the Microsoft LB which is very easy and no need any external requirements like addtional Load Balancer or any Appliance . Anyhow as per the VMware they wont support for any third-party product so going with Microsoft LB doesn’t make any difference.

I have followed the VMware document in this blog for configuring the SSO LB Setup.

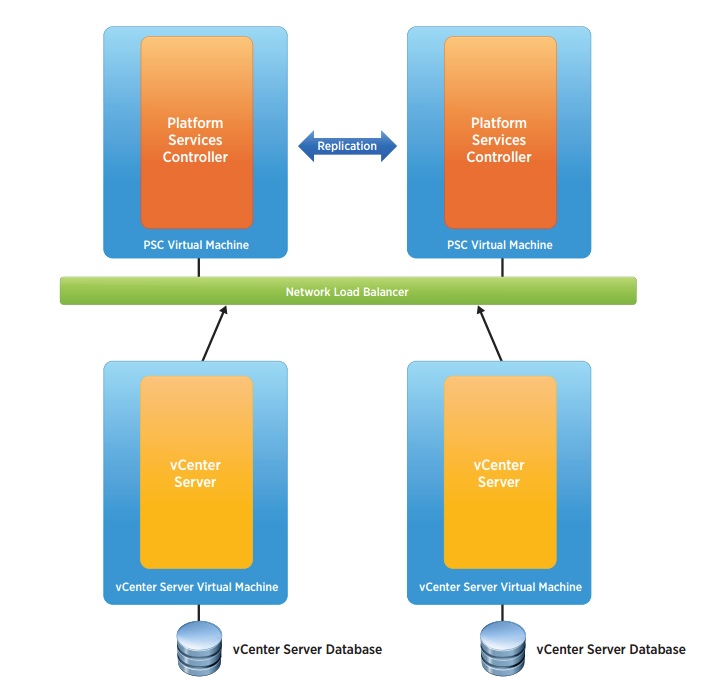
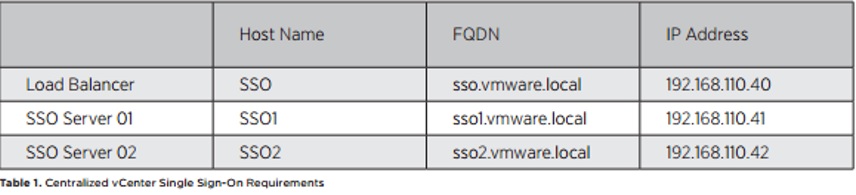
VMware recommends the centralized SSO server when we have 8 or more vCenter server are present in our location.

ssolb

PIC is taken from the VMware.

Pre-installation Checklist::

  1. We need two VMs for the SSO LB with the Load Balancer IP.ssolb1
  2. Download the latest vCenter Server ISO for the SSO installation.
  3. Need Microsoft Visual C++ 2008 Redistributable Package.Pls note we need 32-bit because OpenSSL tool has a dependency on the same.
  4. Download and install Win32 OpenSSL (version 0.9.8)
  5. Create the Certificate Folder Structure . C:\Certs\SSO
  6. Create a vCenter Single Sign-On Configuration file. C:\certs\sso\sso.cfg

[ req ]
default_bits = 2048
default_keyfile = rui.key
distinguished_name = req_distinguished_name
encrypt_key = no
prompt = no
string_mask = nombstr
req_extensions = v3_req
[ v3_req ]
basicConstraints = CA:FALSE
keyUsage = digitalSignature, keyEncipherment, dataEncipherment
extendedKeyUsage = serverAuth, clientAuth
subjectAltName = DNS:sso1, DNS:sso1.vmware.local, DNS:sso2, DNS:sso2.vmware.local,
DNS:sso.vmware.local, IP:192.168.110.40
[ req_distinguished_name ]
countryName = Country
stateOrProvinceName = State
localityName = City
0.organizationName = Company Name
organizationalUnitName = vCenterSSO
commonName = sso.vmware.local


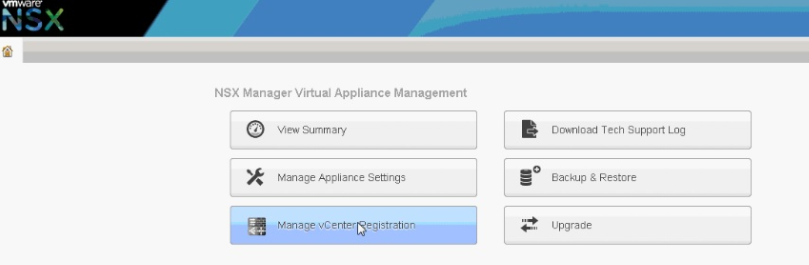
Depoly the first vCenter Single Sign-on Installation.

 Login to the VMware.Local

On the Menu choose the vCenter Single Sign-on option under Custom Install and click Install

Give Next in the Wizard and accept the Agreement

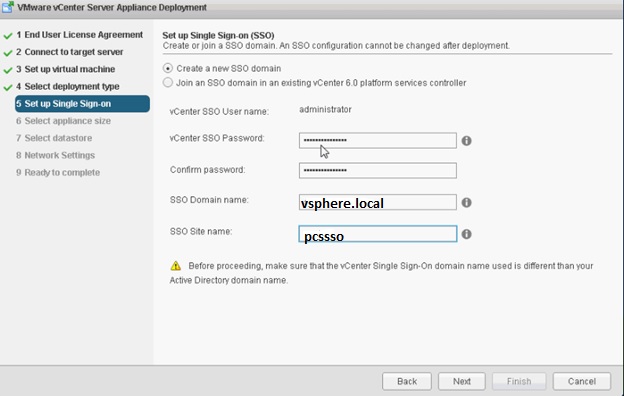
Select the First vCenter Server below option.

ssolb3

Provide the Password for the built-in administrator@vsphere.local

SSOlb4

Select the Site name – Select the SSO Port Settings – Finish the Installation.

 Additional vCenter single Sign-On Installations

Connect to the vCenter Server ISO on the second server sso2.vmware.local.

On the Menu choose the vCenter Single Sign-on option under Custom Install and click Install

Give Next in the Wizard and accept the Agreement

ssolb5

Provide the Partner host name as sso1.vmware.local and provide the password for the built-in administrator@vsphere.local account used with sso1.vmware.local and click Next.

Accept the host certificate and give Next and Complete the Installation.

vCenter Single Sign-On Certificates .

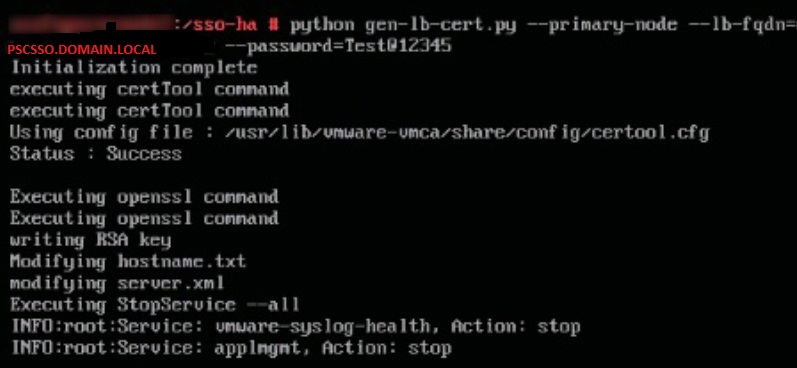
All vCenter Single Sign-On servers that participate in the loadbalanced configuration require certificate updates. In our example, we will use a Microsoft certificate authority (CA) as our trusted root authority and will generate certificate requests with OpenSSL.

Generate the Certificate Request.

Open the CMD Prompt with Administrator Rights and run the below command to create the certificate request and export the private key.

openssl req -new -nodes -out c:\certs\sso\rui.csr –keyout c:\certs\sso\rui-orig.key -config c:\certs\sso\sso.cfg.

sssolb6

Run the Following to convert the key into RSA Format:

openssl rsa -in c:\certs\sso\rui-orig.key -out c:\certs\sso\rui.key

ssolb7

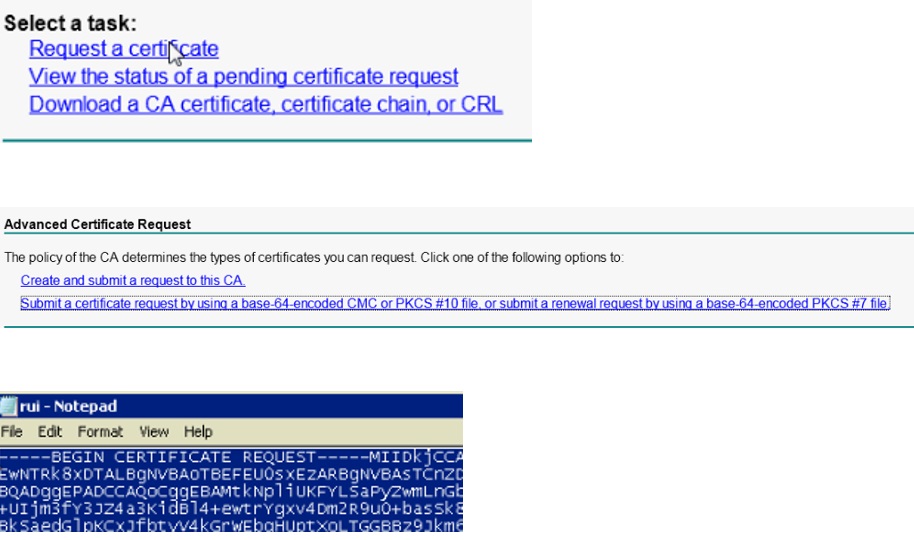
Download the CAs Root Certificate with Based64 encoding. Rename it to certnew.cer – Root64.cer and save it to the c:\certs

ssolb8

With a text editor, open the private key C:\certs\sso\rui.csr and copy the entire contents into the CA certificate request field. Select the template with data encipherment enabled (optional step previously mentioned) and download the certificate as Base64 encoded. In our example, the file generated is named certnew.cer and is renamed as rui.crt and then placed into the following: C:\certs\sso

ssolb9

sso10

sso11

Run the following to create an archive file (ssoserver.p12) of all certificates and keys: openssl pkcs12 –export –in c:\certs\sso\rui.crt –inkey c:\certs\sso\rui.key – certfile c:\certs\Root64.cer –name “ssoserver” –passout pass:changeme –out c:\certs\ sso\ssoserver.p12

sso13

Change to the VMware directory by typing the following: CD C:\Program Files\Common Files\VMware\VMware vCenter Server – Java Components\bin\

Run the following to create the Java KeyStore:

keytool –v –importkeystore –srckeystore C:\certs\sso\ssoserver.p12 –srcstoretype pkcs12 –srcstorepass changeme –srcalias ssoserver –destkeystore C:\certs\sso\roottrust.jks -deststoretype JKS –deststorepass testpassword –destkeypass testpassword

If asked whether the existing entry alias ssoserver exists, overwrite? Type: yes

Run the following to add the root certificate to the Java KeyStore:

keytool –v –importcert –keystore C:\certs\sso\root-trust.jks –deststoretype JKS – storepass testpassword –keypass testpassword –file C:\certs\Root64.cer –alias root-ca

When asked whether to trust this certificate, type: yes

sso14

Run the following to copy the Java KeyStore to the required Java KeyStore name:

Copy C:\certs\sso\root-trust.jks C:\certs\sso\server-identity.jk

sso15

Configuring CA-Signed SSL Certificates

Run the following to set the correct environment variables:

SET JAVA_HOME=C:\Program Files\Common Files\VMware\VMware vCenter Server – Java Components SET PATH=%PATH%;C:\Program Files\VMware\Infrastructure\VMware\CIS\vmware-sso;%JAVA_ HOME%\bin

sso16

Change to the OpenSSL directory; type and run the following: CD \OpenSSL\bin

Register the new root certificate in the VMware trust store; type and run the following:

openssl x509 –noout –subject_hash –in C:\certs\Root64.cer

This will create an eight-digit hexadecimal value that will be used below.

Run the following to create an SSL directory:

mkdir c:\ProgramData\VMware\SSL

Run the following to copy the Root64.cer certificate to the SSL folder:

Copy C:\certs\Root64.cer C:\ProgramData\VMware\SSL\.0

Run the following to copy the Root64.cer file to the SSL folder and rename it to ca_certificates.crt:

more C:\certs\Root64.cer >> C:\ProgramData\VMware\SSL\ca_certificates.crt

sso17

To change the vCenter Single Sign-On server configuration to reflect the NLB, with a text editor, create three text files within the C:\certs directory and name as shown.

Filename: C:\certs\admin.properties

[service]

friendlyName=The administrative interface of the SSO server

version=1.5

ownerId=

productId=product:sso

type=urn:sso:admin

description=The administrative interface of the SSO server

[endpoint0]

uri=https://sso.vmware.local:7444/sso-adminserver/sdk/vsphere.local

ssl=c:\certs\Root64.cer

protocol=vmomi

Filename: C:\certs\gc.properties

[service]

friendlyName=The group check interface of the SSO server

version=1.5

ownerId=

productId=product:sso

type=urn:sso:groupcheck

description=The group check interface of the SSO server

[endpoint0]

uri=https://sso.vmware.local:7444/sso-adminserver/sdk/vsphere.local

ssl=c:\certs\Root64.cer

protocol=vmomi

Filename: C:\certs\sts.properties

[service]

friendlyName=STS for Single Sign On

version=1.5

ownerId=

productId=product:sso

type=urn:sso:sts

description=The Security Token Service of the Single Sign On server.

[endpoint0]

uri=https://sso.vmware.local:7444/ims/STSService/vsphere.local

ssl=c:\certs\Root64.cer

protocol=wsTrust

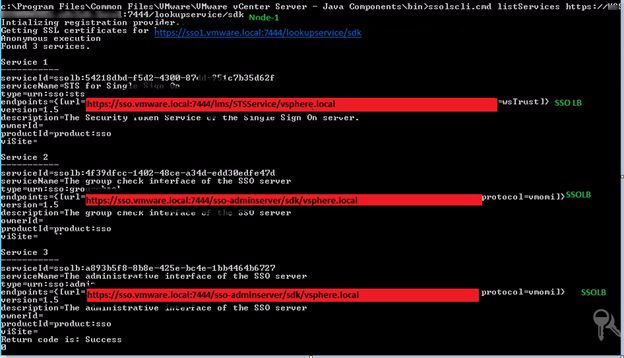
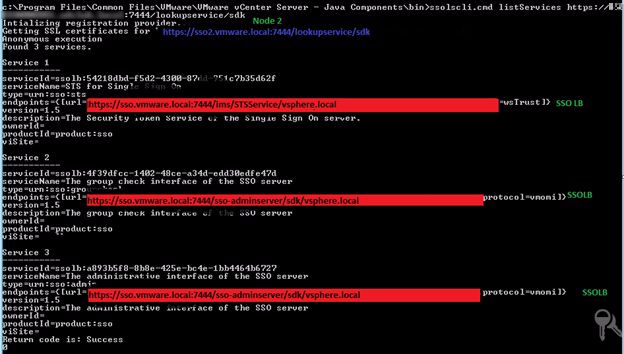
Run the following to list the vCenter Single Sign-On services: ssolscli listServices https://sso1.vmware.local:7444/lookupservice/sdk

sso18

PIC is taken from the VMware.

For each service returned, the first field will display as the following: :

Each service site name and 32-digit hexadecimal value must be saved to a text file for each corresponding service type:

ECHO Palo Alto:<thirty two digit hexadecimal value> >> C:\certs\gc_id

ECHO Palo Alto:<thirty two digit hexadecimal value> >> C:\certs\sts_id

ECHO Palo Alto:<thirty two digit hexadecimal value> >> C:\certs\admin_id

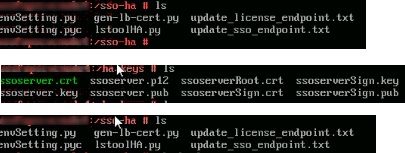
Open a Windows Explorer window and navigate to the following: C:\ProgramData\VMware\CIS\runtime\VMwareSTS\conf) Create a backup directory and make a backup of the following files by copying them into the backup folder:

ssoserver.crt

ssoserver.key

ssoserver.p12

In the command prompt windows, copy the three certificate files to the correct destination by typing the following:

copy C:\certs\sso\ssoserver.p12 c:\ProgramData\VMware\CIS\runtime\VMwareSTS\conf\ ssoserver.p12 copy

C:\certs\Root64.cer c:\ProgramData\VMware\CIS\runtime\VMwareSTS\conf\ ssoserver.crt copy

C:\certs\sso\rui.key c:\ProgramData\VMware\CIS\runtime\VMwareSTS\conf\ ssoserver.key

Before we can update the vCenter Single Sign-On service information, we must add the sso.vmware.local into the local host files, because this entry will create an error prior to configuration of the load balancer.

Type the following: notepad C:\Windows\System32\Drivers\etc\hosts Then add the following:

192.168.110.41 sso.vmware.local #Node1 IP

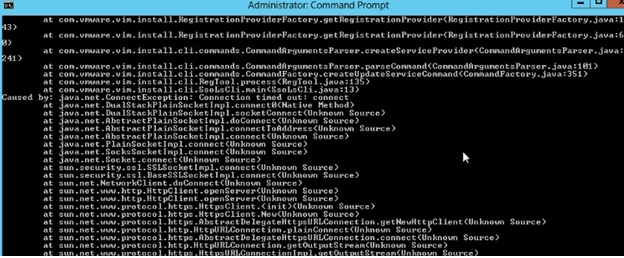
Pls note if we are not adding the entry then we will receive the below error when we running the ssolsclt to update the service.

sso19

Run the following to update the three vCenter Single Sign-On services with the service files created with

the NLB configuration. Type the following:

ssolscli updateService -d https://sso1.vmware.local:7444/lookupservice/sdk -u administrator@vsphere.local -p <password> -si C:\certs\gc_id –ip C:\certs\gc.properties

ssolscli updateService -d https://sso1.vmware.local:7444/lookupservice/sdk -u administrator@vsphere.local -p <password> -si C:\certs\admin_id –ip C:\certs\admin.properties

ssolscli updateService -d https://sso1.vmware.local:7444/lookupservice/sdk -u administrator@vsphere.local -p <password> -si C:\certs\sts_id –ip C:\certs\sts.properties

NOTE: If you receive a Server certificate assertion not verified and thumbprint not matched error, follow step

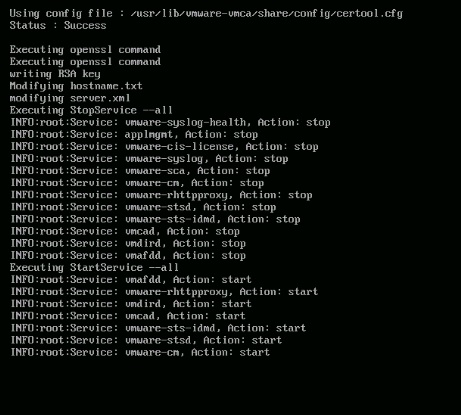
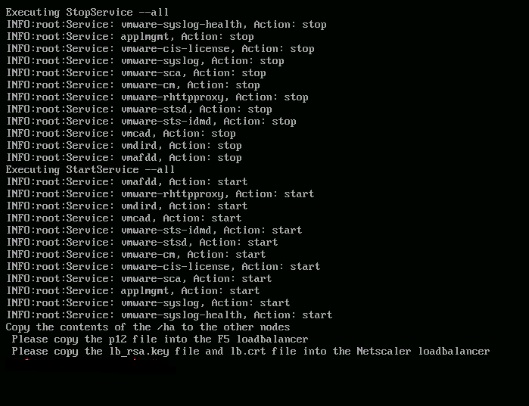
Restart the VMware Security Token Service and repeat the command.

net stop VMwareSTS \ net start VMwareSTS

Confirm that the updates have been applied by listing the vCenter Single Sign-On services.

Type the following:

ssolscli listServices https://sso1.vmware.local:7444/lookupservice/sdk

The endpoints entry should now show the load balance URL sso.vmware.local for each service.

Remove the temporary host entry applied to the local hosts file by deleting the sso.vmware.local entry.

Log in to sso2.vmware.local and open an elevated command prompt.

Open a Windows Explorer window. Navigate to \\sso1.vmware.local\c$ and copy the certs directory to C:\ on sso2.vmware.local \\sso1.vmware.local\c$\ProgramData\VMware and copy the SSL directory to C:\ProgramData\VMware on sso2.vmware.local

Run the following to set the correct environment variables:

SET JAVA_HOME=C:\Program Files\Common Files\VMware\VMware vCenter Server – Java Components SET PATH=%PATH%;C:\Program Files\VMware\Infrastructure\VMware\CIS\vmware-sso;%JAVA_ HOME%\bin

Before we can update the vCenter Single Sign-On service information, we must add the sso.vmware. local into the local host’s files on sso2.vmware.local because this entry will create an error prior to configuration of the load balancer. Type notepad C:\Windows\System32\Drivers\etc\hosts and add

192.168.110.42 sso.vmware.local #Node 2 IP

 In the command prompt window, copy the three update files to the correct destination. Type the following:

copy C:\certs\sso\ssoserver.p12 c:\ProgramData\VMware\CIS\runtime\VMwareSTS\conf\ ssoserver.p12

copy C:\certs\Root64.cer c:\ProgramData\VMware\CIS\runtime\VMwareSTS\conf\ ssoserver.crt

copy C:\certs\sso\rui.key c:\ProgramData\VMware\CIS\runtime\VMwareSTS\conf\ ssoserver.key

Restart the VMware Security Token Service to accept the updated certificate files. Type the following: net stop VMwareSTS

net start VMwareSTS

Update the three services with the current information. Type the following:

ssolscli updateService -d https://sso2.vmware.local:7444/lookupservice/sdk -u administrator@vsphere.local -p -si C:\certs\gc_id –ip C:\certs\ gc.properties

ssolscli updateService -d https://sso2.vmware.local:7444/lookupservice/sdk -u administrator@vsphere.local -p -si C:\certs\admin_id –ip C:\certs\admin.Properties

ssolscli updateService -d https://sso2.vmware.local:7444/lookupservice/sdk -u administrator@vsphere.local -p -si C:\certs\sts_id –ip C:\certs\sts. Properties

Confirm by typing the following that the updates have been applied on the both the nodes.

ssolscli listServices https://sso1.vmware.local:7444/lookupservice/sdk

sso20_censored

ssolscli listServices https://sso2.vmware.local:7444/lookupservice/sdk

sso21_censored

The endpoints entry (line 4) should now show the load balance URL sso.vmware.local for each service.  Remove the temporary host entry applied to the local host’s file by deleting the sso.vmware.local entry.

Next comes the Configuring the Microsoft Network Load Balancer.

Hardware requirements

To run an NLB cluster, the following are hardware requirements:
All hosts in the cluster must reside on the same subnet.

There is no restriction on the number of network adapters on each host, and different hosts can have a different number of adapters.

Within each cluster, all network adapters must be either multicast or unicast. NLB does not support a mixed environment of multicast and unicast within a single cluster.

If you use the unicast mode, the network adapter that is used to handle client-to-cluster traffic must support changing its media access control (MAC) address.

Software requirements

To run an NLB cluster, the following are software requirements:
Only TCP/IP can be used on the adapter for which NLB is enabled on each host. Do not add any other protocols (for example, IPX) to this adapter.

The IP addresses of the servers in the cluster must be static.

Install the Network Load Balancer Feature on both the nodes.

lbf1 LBf

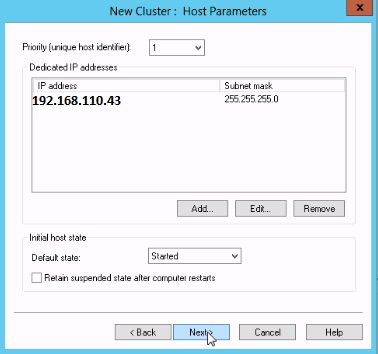
Add the second NIC on both the nodes and assign the Static IP with the same subnet of the load balancer IP.

LB : 192.168.110.40

Node 1 Second NIC IP : 192.168.110.43

Node 2 Second NIC IP : 192.168.110.44

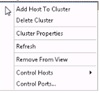
Open the Network Load Blancing Manager form the administrative tools on Node1.

Create the New Cluster.

nbc

Connect the Node 1 and select the second NIC IP.

nbc1

Select Next Host Parameters

nbc2


Priority Unique Host Identifier should be 1 for the top and 32 for the least priority and we should not have the same number on other nodes in the cluster.

Initial Host State – It is for to mention when can be the host  to re-join in to the cluster after reboot , keep it as default Started .

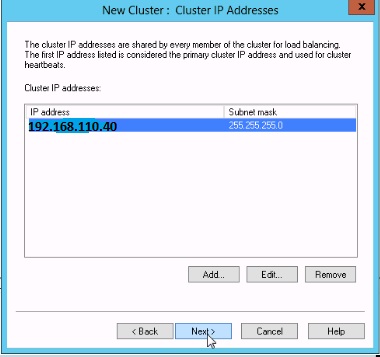
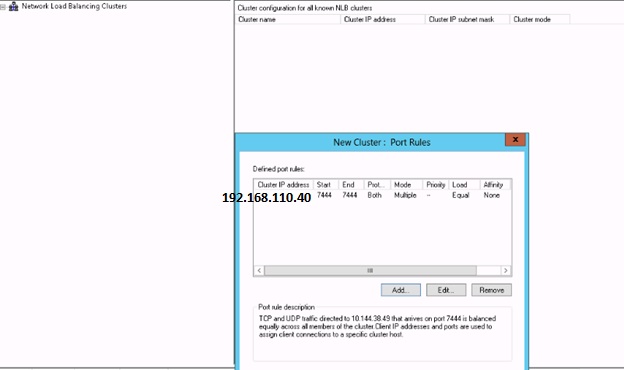
Next Add the Load Balancer IP.

nbc3

nbc4

nbc5

Provide the Load Balancer FQDN Name.

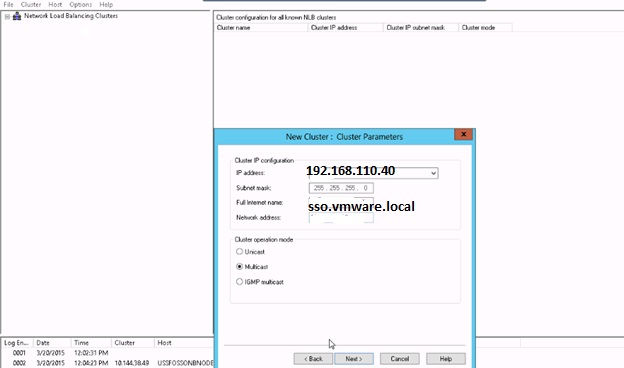
Select the Multicast which is used to communicate between two nodes.

nbc6

Port rule :  Delete the default and change the port to 7444 and select the Affinity to None so that traffic will be routed to the both the nodes and in case if we select Single and it will send the traffic only to single node.

nbc7

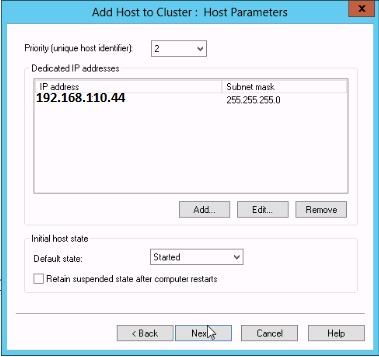
Select Add host cluster and connect the Second Load Balancer.

rr4d

nic22

nic222

Note here the priority it is 2 .

nic21

download

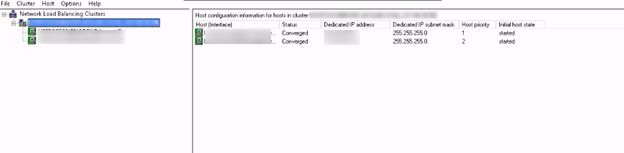
Once everything is configured then we can see the Cluster with the LB having two nodes and test the configuration by power down the one node  and try the https://sso.vmware.com:7444/lookupservice/sdk link.Do the same test on the second node.

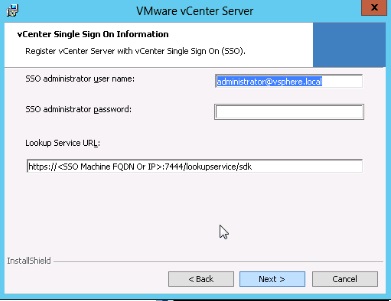
Provide the LB details while configuring the vCenter , Inventory Service and Webclient .

vcet1 vcet

We can find the SSOLB name with details by login in to the web client.

vcet1_censored


Power down the SSO Node 1 and test the connectivity of the VC by having only the SSO Node 2 and do the same testing for the Node 2 also.

Reference :

Click to access VMware_vCenter_Server_5.5_LB_SSO_Technical_Reference.pdf

https://www.google.com/webhp?sourceid=chrome-instant&ion=1&espv=2&ie=UTF-8#q=microsoft+network+load+balancing+2012

Posted in Certificate, High-Availability, SSO, VMware, Windows, Windows Network Load Balancing | Tagged , , , , | Leave a comment

How to SCP files to VMware vCenter Appliance 6.0 ( vCSA)

When I was trying to copy the files using winscp or SCP from the other linux system to the vCSA , ended up with the below error.

Unknown command : ‘scp’

This is because we need to change the shell to bash which can be done using the command chsh ( Pls refer the KB below ) or we can use usermod -s /bin/bash root and also we can do it manually by editing the /etc/passwd.

CHSH Method.

  1. Initiate an SSH connection to the vCenter Server Appliance.
  2. Provide the root user user name and password when prompted.
  3. Run the following command to enable the Bash shell:
    shell.set --enable True
  4. Run the following command to access the Bash shell:
    shell
  5. In the Bash shell, run the following command to change the default shell to Bash:
    chsh -s "/bin/bash" root
  6. Use WinSCP to upload the certificate files to the vCenter Server Appliance.
  7. Return to the Appliance Shell by running the following command:
    chsh -s /bin/appliancesh root

Manual Method .

Login in to the console and press F1 – Login in to the shell using the command “shell.set –enable True”

Go to the/etc/passwd.

 Point to the user root and delete the appliancesh and change it to /root:/bin/bash and then copy the data to the appliance.

shellshell1


Once the transfer is done then change it back to the original /root:/bin/appliancesh.

Reference:

http://kb.vmware.com/selfservice/microsites/search.do?language=en_US&cmd=displayKC&externalId=2107727

Posted in Vcenter Appliance, vCSA 6.0, VMware | Tagged , , , | 2 Comments

VMware vCenter Server Appliance 6.0 – “Failed to Start Services. Firstboot Error”.

I was trying to install the vCSA 6.0,  it was failing with the below error “Failed to Start Services. Firstboot Error”.

download

After sometime spent on the troubleshooting and few re-installation ,I realize the tab for the networking – Choose the network in which our VC vlan’s were missing and it was showing that Non-Ephemeral port groups are not supported . On my previous Installation I was trying without selecting any vlan with just the IP and other info…


netd

Again I started the Installation and found that it is clearly mentioned that Ephemeral port group is must for the appliance and later we can change it to other port group.

1netd

And the Next challenge is changing the port binding from the default Static to Ephemeral which cant be done on the portgroup which has already pointed to the VMs\Hosts .I think in general most of our environment is configured with the static binding by default and If we try to configure on the port group running VMs then it will show the below error.

errorq

So we need to create the new port group with the Ephemeral settings to some-other free vlan or new vlan and once the Installation is done then we can change it to the appropriate vlan.

vlan


Once the Installation is done then power down the Appliance and change it to the proper vlan in the vnic network settings and also from the Appliance Management Network or easiest way is just create the standard switch in the appliance vlan and select it during the installation , later change it to the distributed switch.

111


Another Important thing to be noted is after the IP change , we need to make sure to change the DNS Entry which should resolve to the proper Name and the IP.

DNS with proper FQDN and IP have to be created prior to the VCSA deployment or it will fail with the error”Firstboot Script Execution Error – The Supplied System Name is not Valid”.

(3)

Pls check my other recent blogs for additional PSC\VC installation issue.

vCSA 6.0 “Firstboot Script Execution Error – Failed to run vdcpromo”

vcsa-6-0-installation-issues-firstboot-script-execution-error

To find the reason for the VMware  recommending to go with Ephemeral and to learn more about it , Pls check the below reference link.

Reference :

http://blogs.vmware.com/vsphere/2012/05/why-use-static-port-binding-on-vds.html

The Secret of Ephemeral Port Groups

Ephemeral ports?


Posted in Vcenter Appliance, vCSA 6.0 | Tagged , , | Leave a comment

Trend Micro Deep Security 9.5 ( VDI Environment-Agentless Protection ) – Part 12.

Pls check my previous blogs for the DSM , Relay Server , vShield End Point , Filter Driver,DSVA, DSA , SSP Server , Policies and Exclusions , Events and Monitoring , VMtools and VDI Environment with Trend Agent. In this blog we can see the Trend DPM with VDI Enivronment running VMware in the background with Agentless protection.

Same like Agent Protection we have to prepare the Golden Image first to provisioning the VM from the Image.

We need to ensure/install the complete VMWare tools with Endpoint Driver on the Golden Image.  This is required for Deep Security to provide agentless protection.

We need to uninstall Microsoft ForFront and any other 3rd party anti-malware software from Golden Image as this will cause scan contentions.

Since Trend or other AV software wont be installed in the Golden Image , we have to disable Windows Security Center anti-virus notifications for vShield Endpoint.

scr

scr2

From the DSM end make sure the below option is enabled and all the ESX hosts are activated with the filter driver with DSVA.

scr3

Create the event-based task in which any new VMs from the mentioned ESX host it will activate with the defined policy.

task

Make sure the Task is enabled and next go to the actions.

task1

Select the options according to the environment and next go to the conditions.

evaesx

Chosse ESX Name and use the wildcard ESX.* so that any ESX in that range will be consider.

Once the Task is configured , we can now go and implement the new VM using the Golden Image.

av

In the Trend DSM Console we can see the New VM is in activated status.

testvm

In the Events we can see the status of the activation.

test1

In my Next Blog we can see the Trend DSM SP1 Installation.

Posted in Trend Micro Deep Security | Tagged , , , , | Leave a comment