Trend Micro Deep Security 9.5 ( vShield Endpoint ) – Part 3

In my previous Trend Micro blogs , I have explained about the  Trend DSM and the Relay Server Installation and in this blog we can see the installation of vSheild Endpoint and its configuration with Trend and the ESX host.

vShield Manager:

vSheild Endpoint is free with ESXi STD , ENT and ENT + and it is one of the function of the vSheild Manager and I believe if we have the license for vCenter and ESXi then we can able to download the  vSheild Manager also.

vSheild Manager needs to be deployed in order to install the VMware vShield Endpoint APIs with Trend will provide agentless anti-malware protection for VMware virtual machines with zero in-guest footprint. Helps avoid security brown-outs commonly seen in full system scans and pattern updates .

Pic was taken from the Trend Doc.

vsheildend111


vShield Endoint:

vsh2

vsh3


vshe endpont

Pic was taken from the VMware , Pls refer the below reference link for more info about the vShield Endpoint.


vShield Endpoint Installation:

After Login to the vSheild Manager, Select the host and go to summary in which we can see the vSheild EndPoint Service and its status and Click Install.

Trendvs


TrendvSheild2  trendvSheild3


After the installation , we can check the vShield Endpoint driver running on the ESX host by the command.

ps | grep vShield-Endpoint-Mux

Trendvshild7


By using the esxcfg-advcfg –get /UserVars/VshieldEndpointSolutionsConfiguration command we can check the configuration of the vShield Endpoint with the DSVA ( Pls see the DSVA section for more info)

trendvshild99_censored

Once the Installation is done, we need to make sure the installation is configured correctly by checking the Networking Settings on the ESXi , there will be a new standard vSwitch was created. This will be an internal vSwitch ( vmservice-vswitch ) with no adapters and the filter drivers on the ESX host will redirect all traffic via the internal switch.

Following Port Groups will be available under the vmservice-vswitch

  • vmservice-vshield-pg
  • vmservice-vmknic-pg
  • vmservice-trend-pg – This port group will be added only after the Trend Filter driver installtion on the host.


trendvSheild4

From the DSM Console also we can check the vSheild Endpoint status.

vsheildend

vSheild Endpoint configuration with VMware tools.

After the Installation of vSheild Endpoint on the ESXi hosts , we have to install the VMCI driver. It will be part of the VMware Tools and embedded as the vSheild Endpoint driver. By default it will be in disable status and we need to enable the same by modifying the features installed in VMware tools. Select the vSheild Endpoint driver from the list of features and install on local hard-drive.Once we enable the drivers then realtime malware protection will be available.Pls note the below is for only the windows server and for unix\Linux we need to install the agent from the trend .

Pls check my VMtools blog for more information.

trendvSheild5

Trendvsheild6

Also use fltmc command to check the vsheild driver ( vsepflt )is running or not and also use load and unload command to enable and disable the driver.

fltmc unload\load vsepflt


fltmcitled


To monitor the vSheild Manager , check the link which explains the steps.

In my next blog we can see the installation of Trend Filter Driver and its function .

Reference : I would recommend to read the below link from VMware which explains about the vShield end point features and functions.

Click to access VMware-vShield5-Endpoint-Datasheet.pdf

Posted in Trend Micro Deep Security, vShield, vShield Endpoint | Tagged , , | 7 Comments

Trend Micro Deep Security 9.5 (Relay Server) -Part 2

 Part-1 blog is about the DSM installation and its function and also Trend DSM 9.6 update

Now in this topic we can see the Trend Micro Deep Security Relay and its function.

Trend Micro Deep Security Relay :

Any Deep Security installation, regardless of whether it is providing Agentless or Agent-based protection, requires at least one Relay-enabled Agent to be installed to download and distribute Security and Software Updates. Any 64-bit Windows or Linux Agent can provide Relay functionality.

Relay Server will be contacting the Trend Micro Security Center to collect the security updates and relaying the information back to the DSM and to Agents and Virtual Appliances. Relay has embedded Agent to provide local protection on the host machine.We can have multiple relays based on our environment in different region which makes agents to reach the near by Relay server for the updates.

As per the Trend below is the recommendation of having the number of Relay Server.

Deep security relay


To rollout an update to an endpoint as fast as possible, then more relay servers are required. Increasing the number of relays simply means updates gets pushed out faster to the endpoints.

Example: • To rollout a 10MB update to 20,000 endpoints within 30 minutes, deploy 4 Deep Security Relays. • To rollout a 10MB update to 20,000 endpoints within 1-2 hours, 2 Deep Security Relays are sufficient.

Deep Security Agents and Deep Security Virtual Appliance (DSVA – agentless), get there updates based on the Relay Group we have defined. For Ex if we have some servers to be protected in East Cost and our main DSM server in West Cost , We can have a separate Relay server in East Cost and create the separate Relay  group in the DSM for the East Cost and make the DSVA to download the update from the same rather than from the main default DSM.


Installation steps of the DSR.

Build a new VM in the corresponding location and just 2 CPU and 4 GB memory is enough.

Download the agent from the local software and copy it in the Relay Server.

DPMRELAY2

Click the Exe and continue the Installation .

DPMRLY1 dSMrly2

Finish the Installation.

dpmrly3

Once the Installation is done then Go to the Computer – New – New Computer and add the New Relay server in DSM.

relayActive

Activate the server and Enable the Relay .

Relayact

Once its enabled we can see the ordinary computer icon to computer with Relay-enabled Agent and also the number of update components the Relay Module is ready to distribute.

relay10

Relay11

Next go to the Administration and Relay Group and create the New Relay Group to the East cost location.

DPMRELAY1

Configuration of the Relay Server is completed and we need to point the Relay Server to the corresponding VMs in the policy .

relay2


Pls check the next blog for the vShield Endpoint configuration.

Posted in Trend Micro Deep Security | Tagged , , , , | 6 Comments

Trend Micro Deep Security 9.5 ( DSM ) -Part 1

In this Blog I will explain the features and the functionality of the Trend Deep Security   product. Trend Micro Deep Security has few components which will provide protection against Malware in real-time, Intrusion prevention. Web Reputation, Firewall rules. It is also available as both agent-based and agentless options.

Protection Modules

Anti-Malware

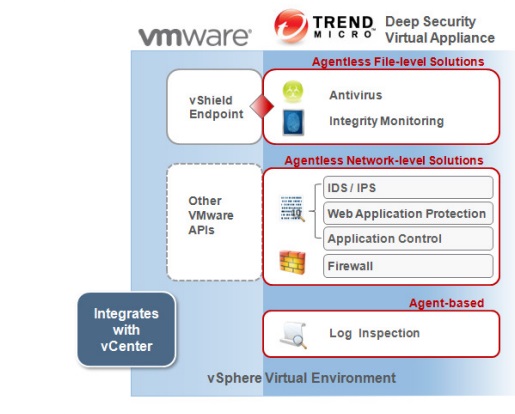
Integrates with VMware environments for agentless protection, or provides an agent to defend physical servers and virtual desktops in local mode.

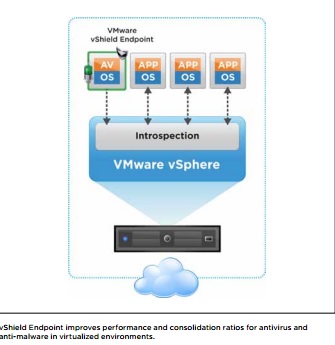
Integrates new VMware vShield Endpoint APIs to provide agentless anti-malware protection for VMware virtual machines with zero in-gues footprint. Helps avoid security brown-outs commonly seen in full system scans and pattern updates. Also provides agent-based anti-malware to protect physical servers, Hyper-V and Xen-based virtual servers, public cloud servers as well as virtual desktops in local mode. Coordinates protection with both agentless and agent-based form factors to provide adaptive security to defend virtual servers as they move between the data center and public cloud.

Web Reputation

Strengthens protection against web threats for servers and virtual desktops.

Integrates with the Trend Micro Smart Protection Network web reputation capabilities to safeguard users and applications by blocking access to malicious urls. Provides same capability in virtual environments in agentless mode through the same virtual appliance that also delivers agentless security technologies for greater security without added footprint.

Integrity Monitoring

Detects and reports malicious and unexpected changes to files and systems registry in real time. Now available in agentless form factor.

Provides administrators with the ability to track both authorized and unauthorized changes made to the instance. The ability to detect unauthorized changes is a critical component in your cloud security strategy as it provides the visibility into changes that could indicate the compromise of an instance.

Intrusion Prevention

Shields known vulnerabilities from unlimited exploits until they can be patched.Helps achieve timely protection against known and zero-day attacks. Uses vulnerability rules to shield a known vulnerability — for example those disclosed monthly by Microsoft — from an unlimited number of exploits. Offers out-of-the-box vulnerability protection for over 100 applications, including database, web, email and FTP servers. Automatically delivers rules that shield newly discovered vulnerabilities within hours, and can be pushed out to thousands of servers in minutes, without a system reboot.

Defends against web application vulnerabilities.

Enables compliance with PCI Requirement 6.6 for the protection of web applications and the data that they process. Defends against SQL injections attacks, cross-site scripting attacks, and other web application vulnerabilities. Shields vulnerabilities until code fixes can be completed.

In this Trend Micro Deep Security 9.5 series, we can see the below topics with detailed information which I learned in my experience .

Part -1 – DSM

Part -2 – Relay Server

Part 3 – vShield Endpoint

Part 4 – Filter Driver Installation

Part 5 – Deep Security Virtual Appliance – DSVA

Part 6 – Deep Security Agent

Part 7 – Smart Scanning Protection Server – SSP Server

Part 8 – Policies and Exclusions 

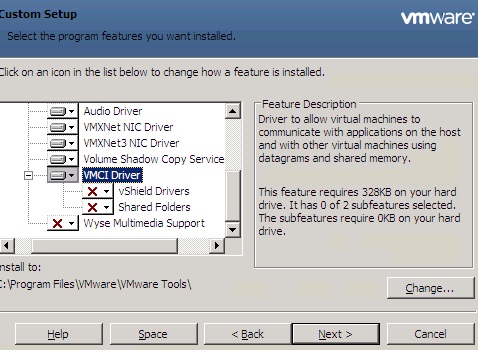
Part 9 – Vmtools with vShield driver installation.

Part 10 – Events and Monitoring 

Part 11 –  VDI Environment – Agent Protection

Part 12 – VDI Environment – Agentless Protection

Part 13 – SP 1 and Relay Server Upgrade

Part 14 – Filter Driver and DSVA Upgrade

Part 15 – NSX Agentless Protection.

Update:2\27\2016

Also check the new blog about   Trend Micro Deep Security Manager 9.6 Upgrade ( 9.5 SP1 – 9.6 ) and Trend DSM 9.6 SP1 windows support and steps to install the filter driver \ DSVA on ESX5.x under Trend DSM 6.0 SP1


Part -1 – Deep Security Manager

Hardware Requirement :

  • Memory 8GB , which includes : 4GB heap memory and 1.5 GB JVM and 2 GB OS overhead.
  • Disk Space : 2GB ( 5 GB recommended )
  • OS – Windows Server 2012\2008 R2 ( 64 bit recommended )
  • DB – Oracle 11g, Oracle 11g Express, Microsoft SQL Server 2012 \2008
  • Memory : 4 GB – By Default MAX Memory Usage.
  • Disk Space : 75GB (150 GB recommended )

Software Requirement :
VMware vSphere (ESXi) 5.0\5.1\5.5
VMware vCenter 5.0\5.1\5.5
VMware vShield Manager 5.1\5.5.3
Trend Micro Deep Security Manager (DSM) 9.5
Trend Micro Deep Security Relay Agent
Trend Micro Deep Security (DS) Filter Driver
Trend Micro Deep Security Virtual Appliance (DSVA)
Trend Micro Smart Protection Server ( SPS )
Trend Micro Deep Security Notifier

Trend Micro Deep Security Manager (DSM) 9.5 :

Centralized web-based management console for controlling and managing all Deep Security enforcement components like Deep Security Agent  DSA’s and Deep Security virtual Appliance DSVA’s  . As per the Trend it is recommended to be windows 2008/2012 R2 64bit virtual server.

The Deep Security Manager coordinates the protection being provided to each guest virtual machine. This is done through the Deep Security Virtual Appliance which uses the VMware Endpoint API to apply the protection to the virtual machines. The Deep Security Filter driver controls network traffic in and out of the guest virtual machines.

Deployment of DSM ( Deep Security Manager )

We need to use the FQDN and it should be resolvable by all the other components.

Its recommended to have at least one secondary DSM node for redundancy and not more than 3 nodes. Also make sure all nodes and the DB must be in the same network segment.

Trend

3. Make sure below ports are opened before proceeding the Installation

Trend1 1113

4. Port Usage:

trendPort3


5.  Pls find the communication details of the DSM and its Purpose and make sure all the communication is working fine before planning the installation.

Trendcommunication

Screen shots are taken from the Trend doc.


Connect the DB using the ODBC connection on the DSM Server to check the connectivity between the DB and the DSM.

DSM2


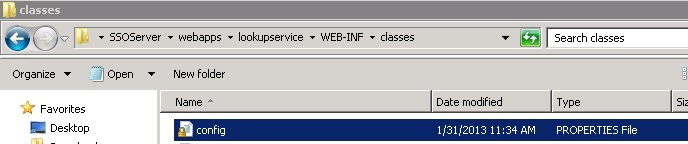
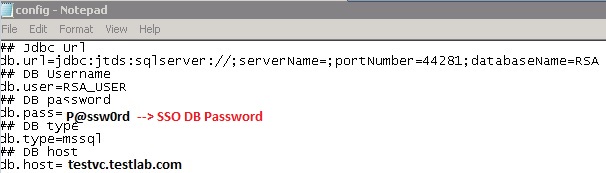
ODBC is not required but it will help for troubleshooting the DB connectivity issue and after the installation we can get the DB information from the below file path.Just additional info…

trenddb


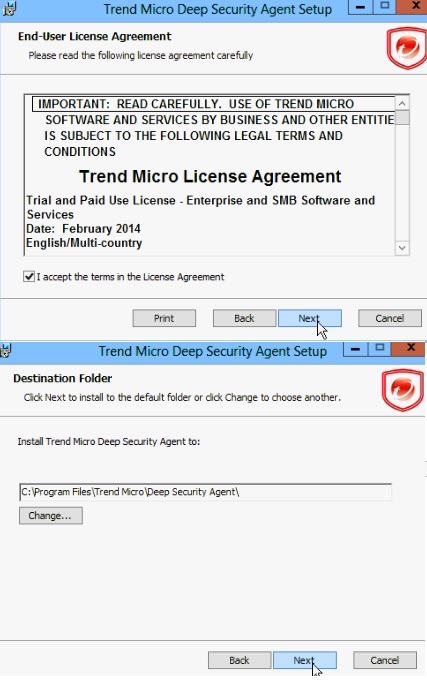
DSM Installation Steps..

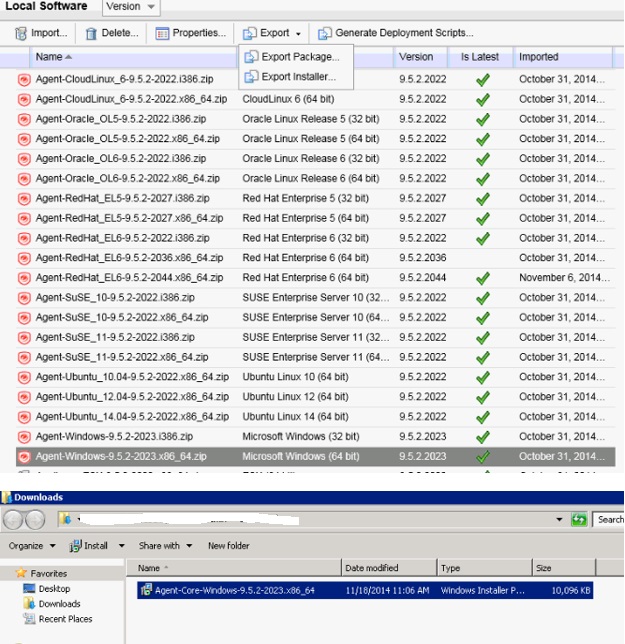
Download the DSM from the Trend Download link and click the Installation EXE.

DSM1

Click Next.

DSM3

Provide the DB  Instance IP and Connect the DB.

DSM5

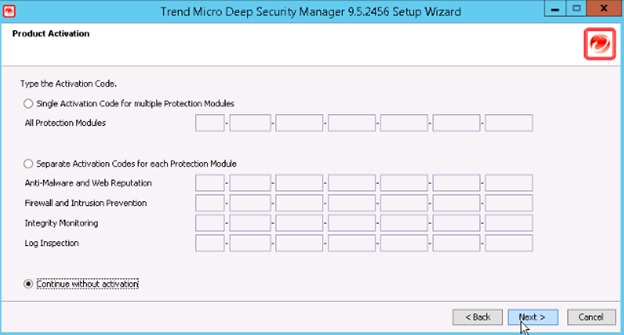
Provide the License details.

DSM6

Give the FQDN of DSM .

DSM7

Set the password for the DSM , Default Username is MasterAdmin.

DSM8

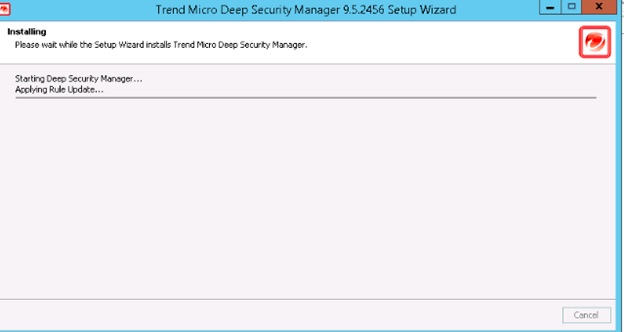
It will start with all the packages installation in it .

DSM9 DSM10 DSM11 DSM12 DSM13DSM14


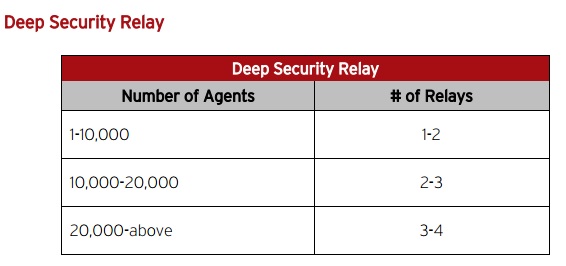
The Deep Security Manager (DSM) JVM default setting for maximum memory usage is 4GB and based on our environment requirement below we need to plan on memory.

Below PIC and Memory info was taken from the Trend Doc.

DSM memory

In case if our DSM Server has more memory and the agent count also like mentioned in the above PIC then we can modify the default JVM Memory .

Default settings can be verified under System > System Information and in the System Details area, expand Manager Node >


memory

To configure the amount of memory available to the Deep Security Manager: For Windows:

1. Go to the Deep Security Manager directory (the same directory as Deep Security Manager.exe). e.g. C:\Program Files\Trend Micro\Deep Security Manager.

2. Create a new file called Deep Security Manager.vmoptions.

3. Edit the file by adding the line: -Xmx8g (in this example, “8g” will make 8 GB memory available to the DSM.)

4. Save the file and restart DSM.

For Linux: 1. Go to the Deep Security Manager directory (/opt/dsm)

2. Create a new file called dsm_s.vmoptions.

3. Edit the file by adding the line: -Xmx8g (in this example, “8g” will make 8 GB memory available to the DSM.)

4. Save the file and restart DSM.

You can verify the new setting by going to System > System Information and in the System Details area, expand Manager Node > Memory. The Maximum Memory value should now indicate the new configuration setting.

Once the Installation is completed then we need to add the AD, VC and vSheild to the DSM.

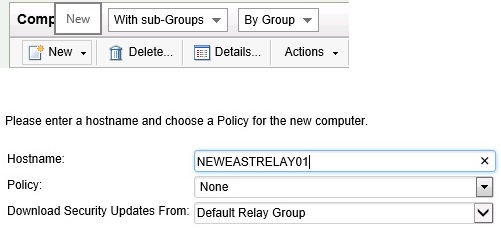
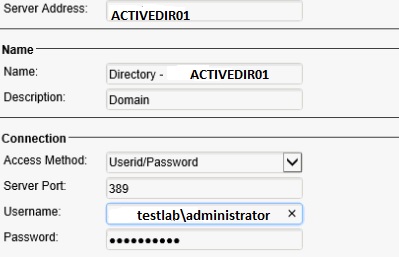
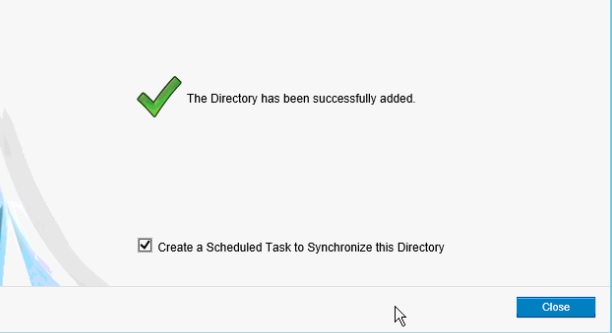
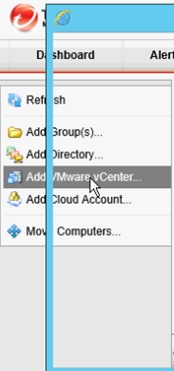
Go to the Computers and right click to select the Add Directory.

DSM17

DSM18 DSM19 DSM22 DSM23

DSM26 DSM27

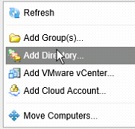
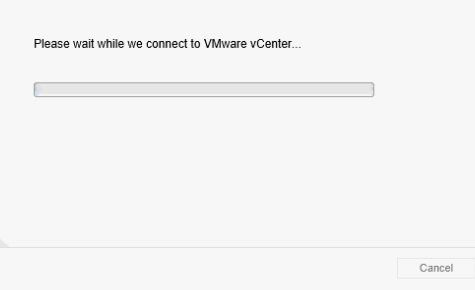
Once AD is added , Next step is to add the VC.

DSM28 Dsm30

DSM32

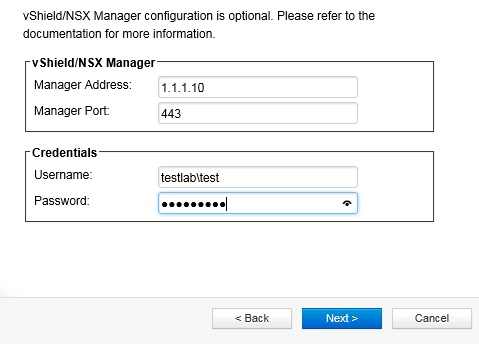
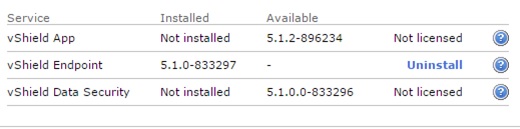
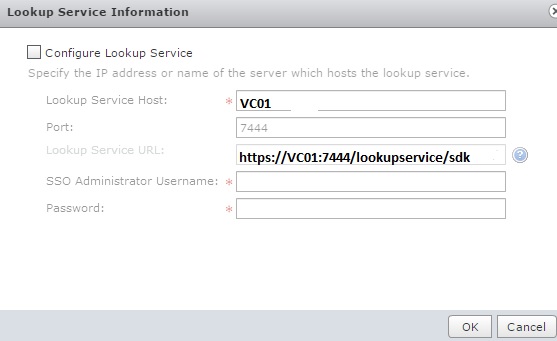
Once VC is connected , It will ask to add the vSheild Manager.

DSM34

Give next and finish the configuration part , Now we can see all the AD Computer Objects and the VC in the DSM.

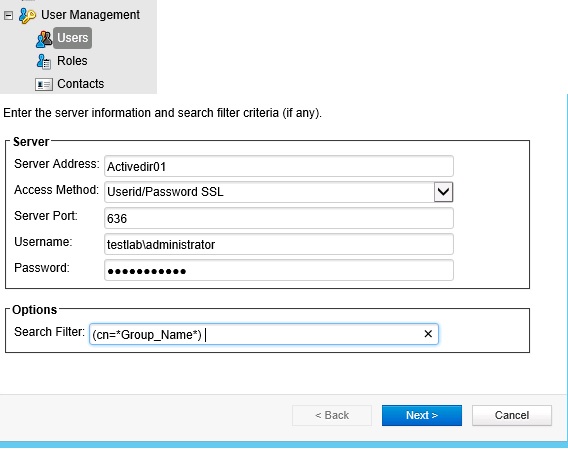
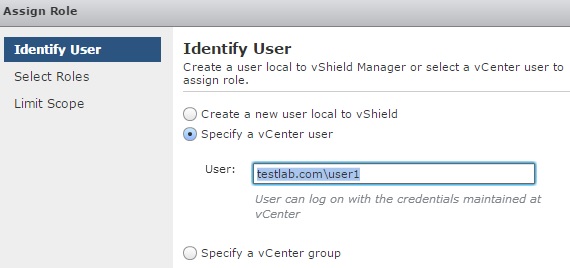
Adding AD users and Groups in Trend DSM.

Go to Administration-User Managment – Synchronize with Directory and Provide the below AD Server information. By using the query  (&(objectClass=user)(| (cn=User1 *)(cn=User2*)(cn=User3*))) we can import the individual users and for the group use the query (cn=*Group_Name*) , Once its imported then we can add to the appropriate roles.

DSM38


Pls check my next blog for the Relay-Server configuration and its function.

Reference :

http://esupport.trendmicro.com/solution/en-US/1060007.aspx

Deep Security 9.5 Administrator’s Guide Product Features 10

Posted in Trend Micro Deep Security, VMware | Tagged , , , , , , | 16 Comments

Information about ESXi Patches

Before updating the new patches on the ESXi host, I was looking to find the patches which were  already applied on the hosts and I used the command “esxcli software vib list “ but  only got the VIBs and drivers info which is not very clear to understand about the version of the patches running on the hosts. After spending some time found an article which provides the good info about the VIBs and the ESXi Patches.I just shared the few points below and pls get in to the below link for more information ..

ESXi from VMware by default  it is made up of multiple software packages ( currently 60 for ESXi 5.0 and 65 for ESXi5.1 ) called VIBs ( VMware Installation Bundles). It has one large VIB for the base system (ESX-BASE),One for the VMwae Tools (tools-light), and other remaining is mostly hardware device drivers. So when we applying the patches it will update one of these VIBs. Each single patch does only change one or multiple VIBs and we need to install the latest patch bundle to make the ESXi fully patched.

From the link  https://docs.google.com/spreadsheets/d/10Vzx4NLhx1XzhmS-hQuIO1wXa98_8EKN3bhXjFx2GgQ/edit?pli=1#gid=1609895093   we can find the VIBs that are updated in a patch bundle . By using the build number in the host we can find the corresponding VIBs from the spreadsheet .Also I found some useful command in the blog “esxcli software sources profile list “ to list the image profile on the patch bundle and “ esxcli software profile install/update “.Pls note it is recommended to use update to keep all installed packages that are not included in the image profile or higher version number.

Also have a look on below useful links 

VMware vCenter Release and Build Number History

Click to access VMware_vSphere_Release_and_Build_Number_History_2015-09-22.pdf

VMware vCenter Release and Build Number History

Reference :

https://kb.vmware.com/selfservice/microsites/search.do?language=en_US&cmd=displayKC&externalId=1014508

http://www.v-front.de/2012/11/are-esxi-5x-patches-cumulative.html

http://kb.vmware.com/selfservice/microsites/search.do?language=en_US&cmd=displayKC&externalId=1012514

Posted in ESXi Patches, Update Manager, VMware | Tagged , , , | Leave a comment

Process Explorer

Performance issues in Microsoft Windows system can be fixed by finding the running process at given time and also it will help to understand how our CPU and other resources are being used . Process Explorer is the most popular tool and it can be downloaded from sysinternals.

Windows has always included the task manager to find the processes that are running on our system but it often doesn’t provide the deep enough information but in Process Explorer we have so many key features which helps to drill in to what was happening on a windows system from a process perspective.As a Windows Administrator we should know the features of the tool and I have described below some key features which was taken from the  Windows Sysinternals Administrator’s Reference book by Mark E. Russinovich, Aaron Margosis and I hope it will give some idea about the functionality of the tool and I would highly recommend this book for the more information.

.

Key Features.

processtools

Tree view shows parent\child process relationships

Color coding to identify the process type ,such as services,.Net process, process running as the same user as procexp, process that are related to job and packed images.

Tooltips show Command line and other information

Highlights to call attention to new and recently exited process.

More Accurate indication of CPU consumption based on CPU cycle.

Identify which process owns any visible window.

Identifies all dynamic-link-library (DLL ) and mapped files loaded by a process and all handles to keneral obj opened by a process

Detailed metrics of memory usage and I/o and TCP/IP endpoints.

Graphical representation of CPU activity, memory usage and I\O activity, both system wide and per-process.

Create process dumps.

Main Windows:

Process list is a table in which each row represents a process on the system and the column represent continually updated attributes of those process.

Process Highlighting:

Light blue :: process that run on same user group account as Procexp.

Pink : Designates services , process containing one or more windows services

Violet:: it denotes “ packed images” tool uses simple rule to identify program files that might contain executable code in compressed form ,encrypted form or both. Ex malware

Brown: it indicates jobs. Job is a windows construct that allows one or more process to be managed as a unit.jobs it is not highlighted by default

Yellow: Indicates .Net process , process which uses .NET framework

Dark gray : indicate suspended process. These are process in which all threads are suspended and cannot be scheduled for execution.

If the process belongs to more than one categories, the precedence order is packed,.net,jobs,services , .net process because it has higher precedence than services..

Newly process will be in green color for one sec and when it exit it will remain in red color for one second.

We can change the color by selecting configure highlight..

Process

Default Columns:

Each Column in the process represents some static or Dynamic attribute of the process and Dynamic attributes are updated at each automatic refresh interval.

Pls find the default setup.

Process – column shows the name of the exe , along with its icon

PID – process ID

CPU – % of CPU

Private bytes – no of bytes allocated and committed by the process for its own use and that are not shareable with other process. Memory leaks are often exhibited by a continual rise in this value.

Working set – Amount of physical memory assigned to the process by memory manager.

Description and company name : Extracted from the version info resources of the exe image file. Tool will populate only if it identify the path to the file and read from it which also need admin rights.

Process tree- Tool shows all the process in tree format which also includes ascending and descending mode.It shows the process parent\child relationships.Whenever a process creates another process,Windows puts the Process ID ( PID) of the creating process ( the parent ) into the internal data structure of the new process ( the child).

View inside tool – First three process inside the tree is system idle process , system , interrupts…

System ideal process and interrupts are not real OS process

System Ideal process – called IDLE by some utilities and it has one thread per CPU , which is used to account the CPU ideal time when windows are not running any code. Since its not the real process the PID will be 0.

System process – it host only kernel mode system threads which only run in kernel mode , this threads execute operating system code from ntoskrnl.exe and device driver code.

Interrupts – pseudo ( virtual) process represents kernel- mode time spent servicing the interrupts and deferred calls.

Additional Information:

Startup and logon process – from the time windows starts until the first user logs on , there is a well-defined sequence of process.  context

Startup sequence changed between widows XP and vista.

  1. System process starts SMSS.exe ( Session manager )
  2. Which starts Csrss.exe ( windows )sub system and winlogon.exe
  3. Winlogon starts the service.exe ( Service control manager process ),Lsass.exe ( Local security authority subsystem) and two process not in pic logonUI.exe (which displays the logon screen on non-domain-joined systems and userinit.exe (which windows started after the user logged on )
  4. exe lanches explore.exe (user shell application) and then exited.
  5. Most user application are direct or indirect descendants of explrer.exe

System process starts an instance smss.exe , which remains running until system shutdown ,  that smss.exe launches two new instance one in session 0 and one in session 1.

Reference :

Mark E. Russinovich, Aaron Margosis
Posted in Tools, Windows | Tagged , | Leave a comment

vShield sync issue with host ” Not applicable to ESX version below 4.1 Patch 3 “

In few cases vShield have failed to sync with host and it will show the wrong  server version on the vSheild status.We have ESX 5.1 running on host but in vSheild it was showing as 4.1 ..

vsheild1

To solve this issue Login to the vShield console login : Admin : Password : Default.

vsheild2

Type Enable  so that it will prompt to login as root and give the same password.

vsheild3

Type Config t and then type no web-Manager , it will stop the Web Manager service.

vsheild4

Type Web-Manager so it will start the Web Manager again.

vsheild5

Exit from the console.

vsheils6

Now it  updated the correct status of the hosts..

vSheild7

Posted in vShield | Tagged | Leave a comment

CHKDSK on Windows 2012 Servers.

Long back we had a very tough time on solving the Windows 2003 system volume corruption issue and the main challenge is we cannot predict the time consuming to complete the chkdisk.

One of our main Tier-1 Application was running on Windows 2003 in which we had a corruption issue and in windows 2003 we have to take the disk offline and the data would be unavailable for users until the chkdsk ran to repair the corruption and it depends on the number of files present in the volume and another most painful issue is for a single corruption ,the entire volume and all of its files would still be analyzed offline.

Fortunately Windows 2012 addresses the issue and introduced new model of managing the file system corruption .

Found the below article from the Microsoft TechNet Library which explains the new CHKDSK benefits and its features  .

Benefits ::

  • Customers can confidently deploy large volumes. Corruption-related downtime is now proportional to only the number of corruptions on the volume.
  • Customers who are using clustered shared volumes do not see any downtime, even for correcting corruption events that would normally require a remount.
  • Windows Server 2012 actively monitors the health state of the file system volume, and it always provides the health state to the administrator.
  • Customers do not see any downtime for transient corruption events.
  • Customers experience significantly fewer corruption events.

Features::

  • Improved self-healing: NTFS instantaneously self-heals more issues online without requiring chkdsk to run offline. This reduces the number of times that chkdsk is required to run.
  • Online analysis: In the previous model, almost all of the offline time required to run chkdsk was spent scanning and analyzing the drive. In Windows Server 2012, the analysis phase of chkdsk, which was responsible for the majority of the offline time, becomes an online, background task. This allows the volume to remain online and available while the system determines whether there is corruption. There is also added logic in the model that verifies the type of corruption is not transient, preventing unnecessary analysis.
  • Corruption correction: When the scan is completed, Windows Server 2012 informs the administrator (by using events and the management consoles), that the volumes need to be repaired and suggests a solution, such as performing a remount or reboot. Because the analysis phase has already completed, no additional scanning or detection is required. Chkdsk directly fixes the identified corruption, and the offline time is minimized to seconds. Therefore, the offline time for a volume is no longer proportional to the number of files on the volume, but rather to the number of corruptions on the volume.

Windows Server 2012 always provides the current health state of the file system volume by using standard events that indicate the current state of the volume. The following figure illustrates how significantly the new chkdsk model changes downtime in the event of corruption.

chkdisk

Reference : http://technet.microsoft.com/en-us/library

Posted in Windows | Tagged , , | Leave a comment

Adding vShield Manager to the AD Users.

To configure SSO on the vShield Manager:

  1. Log into your vShield Manager, then click Settings & ReportsConfiguration.
  2. Click Editfor the Lookup Service and reconfigure SSO.
  3. Click OK, then click Yesin the Security warning pop-up.
  4. Wait for the configuration to complete.

SSO has now been successfully reconfigured on vShield Manager.

vsh

Once added the lookup service  then we have to add the AD users with fully qualified windows domain .

vsh1

vsh2

Also while login in to the vSheild Manager use the fully qualified windows domain name.

vsh4

Posted in VMware, vShield | Tagged , | Leave a comment

How to unlock or reset the SSO password and possible way to find the SSO Master password.

If we don’t remember the login password of SSO ( admin@system-domain ) , we can reset the same using the rsautil sso command but we require the Master password of the SSO which was provided during the installation and without the Master Password , only way is to re-install the VC but its really very pain to do the same , from the below blog they have  suggested to try two method , one by identifying the SSO DB user name so in most cases we use to give the same password for admin and DB , next  is unsupported method by VMware is to build a temp SSO db and copy the hash to your prod db .

Method 1.

Login to the VC and find the below path and open the config file to find the DB password. In most cases we used to have the same password for admin and DB , in my case also the same so I am able to reset the password..

ssoadmin

ssoadmin1

ssoadmin3

Method 2 :

http://translate.google.ie/translate?sl=de&tl=en&js=n&prev=_t&hl=en&ie=UTF-8&layout=2&eotf=1&u=http%3A%2F%2Fwww.die-schubis.de%2Fdoku.php%3Fid%3Dvmware%3Avsphere%26%26_sm_au_%3DiVVqjkrsQ0sLqFW6&act=url

ssoadmin4

I tried it my lab and the result is success , able to change the password ..

Reference :  http://translate.google.ie/translate?sl=de&tl=en&js=n&prev=_t&hl=en&ie=UTF-8&layout=2&eotf=1&u=http%3A%2F%2Fwww.die-schubis.de%2Fdoku.php%3Fid%3Dvmware%3Avsphere%26%26_sm_au_%3DiVVqjkrsQ0sLqFW6&act=url

http://kb.vmware.com/selfservice/microsites/search.do?language=en_US&cmd=displayKC&externalId=2034608

https://communities.vmware.com/thread/428929

Posted in SSO, VMware | Tagged | Leave a comment

Arguments for first disk – Auto Depoly

vSphere 5.1 added the new feature in Auto Deploy :

Stateless Caching \ Stateful  Install feature .

In this method we can enable the option to save the ESXi Image to an assigned dedicated boot disk and it can be a local disk,a lun or USB .

Stateless Caching:: Apply the host profile to cache the image on a local disk or USB and the boot disk will act as a backup boot device that can be used when PXE boot failure or issue in network layer.

Stateful Installs:: Apply the host profile to cache the image on a local disk or USB and the subsequent boots will be from the boot disk and it no longer uses Auto Deploy.

The caching of the image will take place after it running in local RAM , the image is copied to local storage device.Configuration have to be defined within the host profiles settings . Like mentioned in the below pic the arguments for first disk to be mentioned and we can use comma-separated list of disks to use , esx for the first disk with ESX installed on it , model or vendor information or specify the name of the vmkernal device driver. In most environment local will work which points to the local disk and in case if its not accepting the local disk or model then use the esxcfg-scsidevs -a  or esxcli storage core adapter list command to find the kernel device driver .

ad


Arguments for first disk :

ad1


Reference : https://pubs.vmware.com/vsphere-51/index.jsp#com.vmware.vsphere.install.doc/GUID-1901B238-EDA5-440A-B352-8EE48EB0AB48.html

Posted in Auto Depoly, VMware | Tagged , | 2 Comments